Understanding Brake Pad Wear Indicators for Safe Driving
Your brakes are the single most critical safety system on your vehicle. Knowing exactly how wear indicators work — and what they’re telling you — can be the difference between a routine service visit and a catastrophic brake failure at highway speed.
Quick take: Brake pads come with built-in wear indicators — small metal tabs that screech against your rotor when friction material runs low. This article explains every type of indicator, what the sounds and dashboard lights mean, and how to inspect pads yourself before spending money on a diagnosis.
What Are Brake Pad Wear Indicators?
Every time you press the brake pedal, your brake pads clamp against a spinning metal disc — the rotor — and friction converts your vehicle’s kinetic energy into heat, bringing you to a stop. That friction material is not infinite. It wears down with every single braking event, and eventually there won’t be enough left to slow the car safely.
Brake pad wear indicators are purpose-built warning systems embedded directly into the pad or the caliper assembly. Their entire job is to alert you before the pad material runs out completely. When that happens, you’re left with bare metal grinding against your rotor — an extremely dangerous, expensive, and entirely preventable situation.
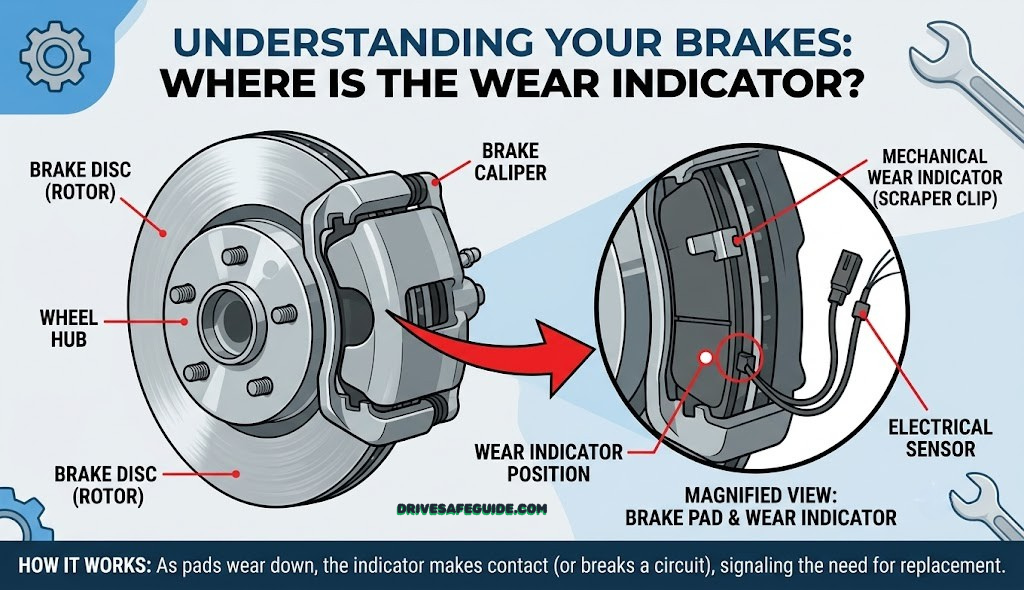
Most modern vehicles use one or more of these indicator systems simultaneously: a mechanical tab that creates an audible screech, an electronic sensor that triggers a dashboard light, and a visual minimum-thickness mark molded directly into the pad material. Understanding all three gives you the earliest possible warning and the most complete picture of your brakes’ condition.
Audible Alert
Metal wear tab squeals against rotor at low pad thickness
Electronic Sensor
Electronic probe triggers warning light on dashboard
Visual Slot
Groove molded into pad disappears when friction material is low
Physical Inspection
Measure remaining thickness through wheel spokes or after removal
The first brake pad wear indicators appeared on European vehicles in the 1970s and spread globally through the 1980s and 1990s as safety regulations tightened. Today, they’re standard equipment on virtually every passenger vehicle sold worldwide. However, not all systems work the same way — and knowing which type your vehicle uses determines how you should respond to warnings.

Digital Brake Pad & Shoe Thickness Gauge
Measure remaining brake pad friction material in seconds without wheel removal — accurate to 0.1mm.
Check Price on AmazonTypes of Brake Pad Wear Indicators
Not every vehicle uses the same wear warning system — and understanding which approach your car uses matters when interpreting the alerts you receive. There are three primary categories, often used in combination.
1. Mechanical (Audible) Wear Indicators
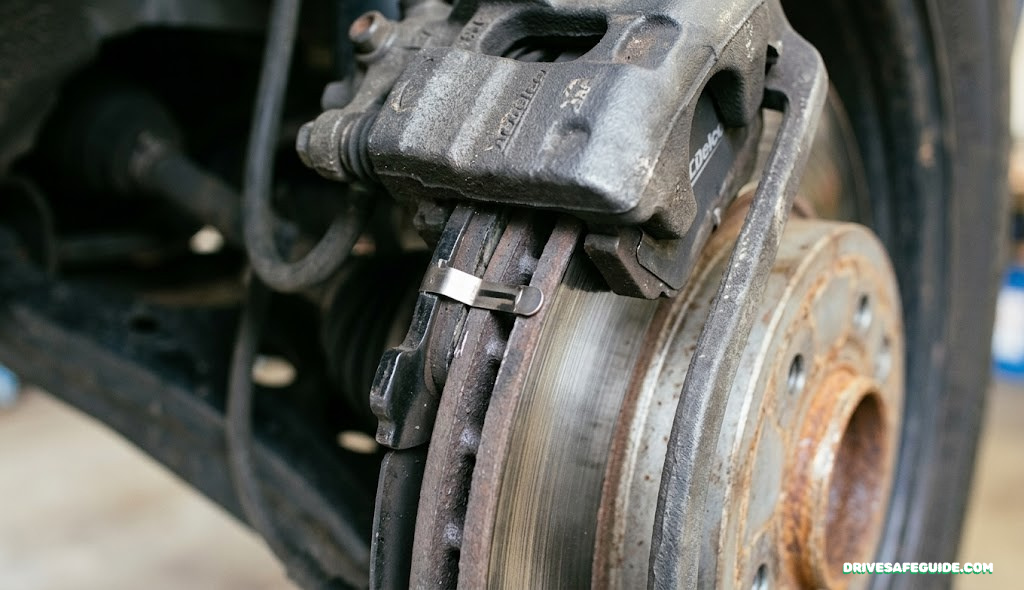
These are the most universally understood indicators — a strip of hardened steel riveted or bonded near the top edge of the brake pad’s backing plate. When friction material wears down to approximately 2–3mm remaining, this metal tab contacts the rotor surface during braking. The result: a high-pitched squealing or screeching sound that signals it’s time to replace your pads.
Fig. 1 — Mechanical wear indicator: the metal tab sits above the rotor on a new pad, then contacts the disc surface as friction material wears down, producing an audible warning screech.
2. Electronic Wear Sensors
More sophisticated systems use a small electrical probe embedded in the pad. When the friction material wears down to a preset minimum, the probe contacts the rotor and completes a circuit — triggering a brake warning light on the instrument panel. These sensors are typically single-use: they’re destroyed when triggered and must be replaced along with the pads.
3. Visual Wear Slots (Indicator Grooves)
Many pad manufacturers machine a shallow groove into the friction material itself. This is visible through the wheel spokes on most vehicles, or after removing the wheel entirely. When the groove disappears, you’ve reached minimum thickness. Some pads use a color-coded backing layer that becomes visible as friction material wears away — a particularly intuitive system for quick visual checks.
| Indicator Type | How it alerts you | When triggered | Reusable? | Best for |
|---|---|---|---|---|
| Mechanical Tab | High-pitched squeal when braking | ~2–3mm remaining | Yes | Budget-conscious drivers |
| Electronic Sensor | Dashboard warning light | Exact preset depth | No | Vehicles with advanced driver info |
| Visual Groove | Groove disappears from pad surface | ~2–3mm remaining | N/A | DIY inspection during tire checks |
| Color Layer | Contrasting color becomes visible | ~2mm remaining | N/A | Quick visual confirmation |
| Physical Measurement | Technician measures thickness | Anytime | Yes | Precise condition assessment |
How Mechanical Wear Indicators Work: The Physics
The mechanical wear indicator is an elegantly simple engineering solution. Understanding the physics behind it helps you interpret what you’re hearing — and stops you from dismissing an early squeal as “just road noise.”
A standard brake pad consists of two main components: the friction material (a composite of metallic, organic, or ceramic compounds bonded together) and the backing plate (a rigid steel plate that the caliper piston pushes against). The wear indicator tab is a small strip of hardened spring steel that is either crimped into a slot in the backing plate or bonded near the top edge of the pad.
Fig. 2 — Full brake pad anatomy. The wear indicator tab is positioned at a precise height so it only contacts the rotor when friction material is critically low.
The key to the mechanical system’s genius is placement precision. Engineers calculate exactly how much friction material should remain when the tab touches the rotor — typically enough for several hundred additional miles of conservative driving, giving drivers time to schedule service without creating an immediate emergency.
Why Pads Sometimes Squeal When New or Cold
Confusingly, brakes can also squeal when the pads are brand new, when the vehicle has been sitting overnight, or on cold damp mornings. A thin layer of surface rust forms on rotors when not in use, and the first few brake applications can create a temporary metallic sound as this layer is cleared away. This type of squealing is normal and typically disappears after a few uses. The key distinction: wear indicator squealing happens consistently every time you brake, not just on the first stop of the day.

Wagner QuickStop Ceramic Disc Brake Pad Set
OEM-matched ceramic pads with integral wear indicator tabs — quieter, longer lasting, and lower dust than semi-metallic alternatives.
View on AmazonElectronic Wear Sensors: How Dashboard Warnings Work
Many European vehicles and higher-trim versions of common American and Asian models use electronic wear sensors in addition to — or instead of — mechanical tab indicators. These sensors represent a more technologically advanced approach to the same fundamental problem: getting your attention before the pads run out.
The Construction of an Electronic Sensor
An electronic wear sensor is a small loop of electrical wire embedded within the brake pad’s friction material at a precise depth. The wire is connected to the vehicle’s Body Control Module (BCM) or brake monitoring circuit. Current flows through the wire continuously during normal operation.
Fig. 3 — Electronic sensor circuit: the wire loop remains intact while pads are thick. When the rotor wears through to the wire, the circuit breaks and triggers a dashboard warning light.
How the Alert is Triggered
When the friction material wears down to the depth at which the sensor wire is embedded, the rotating rotor surface cuts through the wire. The electrical circuit is broken. The BCM detects the open circuit and illuminates the brake warning light — usually depicted as an exclamation mark inside a circle, or the word “BRAKE” — on the dashboard.
Differentiating Brake Warning Lights
A red brake warning light can mean several things, not all of them pad-related. Before assuming a wear sensor has triggered, it’s worth checking whether your parking brake is fully released (a common cause of a false alarm) and whether your brake fluid reservoir is low. An OBD2 scan tool can pull brake-related fault codes if you want to confirm the source before spending money on new pads.
Warning Sounds Decoded: Squeal vs. Grind vs. Pulse
Brakes are remarkably communicative. The sounds they make — when they make them, for how long, and under what conditions — form a diagnostic language that every driver should learn to interpret. Different sounds indicate different problems with very different levels of urgency.
| Sound | When it occurs | Most likely cause | Urgency | Action |
|---|---|---|---|---|
| High-pitched squeal (constant) | Every time you brake | Mechanical wear indicator tab on rotor | Medium | Schedule service within the week |
| Morning squeal (clears quickly) | First 1–2 braking events, then gone | Surface rust on rotor (normal) | Low | Monitor — normal if only morning occurrence |
| Deep metallic grinding | Throughout braking or constantly | Bare metal pad backing on rotor | STOP DRIVING | Tow vehicle immediately — rotor damage |
| Clicking or clunking | Braking or releasing pedal | Loose pad hardware, worn caliper pins | Medium | Inspect hardware, service soon |
| Pulsing / rhythmic thumping | As you brake, linked to wheel rotation | Warped rotor or uneven pad deposit | Medium | Inspect and likely resurface/replace rotors |
| Soft grinding + vibration in pedal | Heavy braking from speed | Glazed pads or deposits on rotor | Medium | Inspect pads and rotors, possibly resurface |
Why Pads Can Squeal Even When Thick
There are legitimate scenarios where you’ll hear brake noise with plenty of friction material remaining. Aggressive high-carbon dust accumulation, glazing from repeated light braking downhill, or the wrong pad compound for your driving style can all produce noise unrelated to pad thickness. This is particularly common in drivers who drive frequently in wet conditions or do a lot of urban stop-and-go braking.
High-performance ceramic pads can also squeal at low speeds or low temperatures. This is a characteristic of the material, not a failure mode — though it’s worth confirming with a visual inspection to rule out actual wear.
Your Dashboard Brake Warning Light: What Each Color Means
Modern vehicles consolidate brake information into a small set of warning indicators on the instrument cluster. Knowing which light is which — and what the colors mean — helps you respond appropriately rather than either panicking or ignoring a genuine warning.
Fig. 4 — Dashboard warning light guide. Red is the most urgent signal; amber/yellow indicates a service needed soon; no light indicates normal operation.
When Red Means Stop Immediately
A red brake light combined with a soft or spongy pedal feel is the most serious warning scenario. This combination typically indicates significant brake fluid loss — either from a leak in the hydraulic system or from a caliper failure. Unlike a wear indicator warning where you have some remaining stopping capacity, a soft pedal in conjunction with a red light means your hydraulic braking force is compromised. Pull over safely and immediately — do not continue driving.
How to Inspect Your Brake Pads Yourself
You don’t need to be a mechanic to get a reliable read on your brake pads’ condition. A simple visual inspection through your wheel spokes takes under two minutes and can confirm whether the squealing you’ve been hearing means “service this week” or “service before you leave the driveway.”
Look Through the Wheel Spokes
Park on a flat surface and ensure the parking brake is engaged. On most modern vehicles with aluminum alloy wheels and open spokes, you can see the brake caliper and a portion of the rotor and pad assembly directly through the spokes. You’re looking for the outer brake pad — the one pressed against the outer face of the rotor — which is typically most visible.
Fig. 5 — On most alloy wheels, the outer brake pad is visible through the spokes. Look for the orange/gray friction material between the caliper and rotor.
Check the Friction Material Thickness
Once you’ve located the outer pad, estimate the thickness of the friction material. A new pad typically has 10–14mm of friction material. You’re looking for whether there’s at least a 1/4 inch (approximately 6mm) of material remaining for comfortable service life, or at least the thickness of a coin (about 2–3mm) before urgent replacement is required. If you can’t see any significant thickness of friction material — or if the pad appears as thin as the metal backing plate — that’s an emergency.
Look at the Rotor Surface
While you’re inspecting the pad, also look at the rotor disc itself. A healthy rotor has a smooth, uniform gray surface. You may see a thin sheen of rust on the outer edge or a very slight surface rust patina if the car has been sitting — this is normal. Grooves or scoring on the contact surface, heavy pitting, or a visible ridge at the outer edge of the rotor (where the pad doesn’t contact) all indicate rotor wear that should be evaluated by a professional. Read more about this in our broader guide on safe driving habits and vehicle care.
Check All Four Wheels
Brake wear is not always uniform across all four wheels. Front brakes on most front-wheel-drive and all-wheel-drive vehicles bear approximately 70–80% of braking load and typically wear significantly faster than rears. However, caliper sticking or uneven hydraulic pressure can cause one side to wear faster than the other. Always check all four wheels and compare. Uneven wear — where one wheel’s pads are significantly thinner than the opposite side — indicates a caliper or hydraulic problem that needs immediate diagnosis.

Orion Motor Tech Brake Caliper Piston Wind Back Tool Kit
Complete brake service kit with 38-piece driver set, compatible with most disc brake calipers — ideal for home brake pad replacement.
View on AmazonBrake Pad Thickness Guide: When to Replace
Brake pad thickness is measured in millimeters, and different thresholds carry different levels of urgency. Here’s the complete breakdown from new to critically worn.
Fig. 6 — Brake pad thickness safety scale. Below 3mm requires immediate service scheduling; below 2mm means stop driving until repaired.
| Remaining Thickness | Condition | What it means | Action required |
|---|---|---|---|
| 10–14mm | Like New | Fresh pad, maximum friction material | No action needed — just monitor |
| 6–9mm | Good | Still well within safe range | Check at next tire rotation |
| 4–5mm | Monitor | Halfway point — plan for replacement within a few months | Note mileage; schedule within 6–8 months |
| 3mm | Service Due | Approaching minimum; wear indicator may be triggering | Schedule replacement within the week |
| 2mm | Replace Now | Minimum legal thickness in most jurisdictions | Replace before driving further if possible |
| <2mm | CRITICAL | Backing plate contacting rotor likely; rotor damage ongoing | Do not drive — tow to shop |
What Happens When You Ignore Wear Indicators
Brake wear warnings exist for a reason. Ignoring them doesn’t just increase your risk — it creates a cascading series of consequences that eventually costs significantly more than the original pad replacement would have.
Stage 1: Wear Indicator Contact (Squealing)
The tab contacts the rotor. You hear squealing. The pads are low but there’s still some friction material remaining. Braking performance is slightly reduced but the system still functions. This is the ideal intervention point — new pads typically cost $100–$200 per axle for parts and labor.
Stage 2: Metal-on-Metal Contact (Grinding)
All friction material is gone. The steel backing plate contacts the rotor directly. Every braking event gouges the rotor surface, creating deep grooves. Stopping distances increase dramatically. The rotor is now damaged beyond resurfacing and needs replacement. Cost escalates to $300–$600+ per axle.
Stage 3: Rotor Damage and Thermal Stress
Continued metal-on-metal contact generates extreme heat, which can warp the rotors. Warped rotors cause the pulsating vibration through the pedal and reduced braking force. At this point, even new pads won’t fully restore braking performance until rotors are also replaced. Cost: $500–$900+ per axle.
Stage 4: Caliper Failure
As friction material disappears, the caliper piston can over-extend, leading to seal failure, fluid leaks, and eventual caliper seizure. A seized caliper can cause one wheel to brake continuously, overheating the assembly and potentially causing a wheel fire. Caliper replacement plus pads and rotors can run $800–$1,500+ per axle.
Cost Comparison: Act vs. Ignore
| Scenario | Parts needed | Estimated cost (per axle) | Result |
|---|---|---|---|
| Replace at wear indicator warning | Pads only | $100–$200 | Full braking performance restored |
| Replace after metal-on-metal stage | Pads + rotors | $350–$650 | Good performance after full service |
| Replace after caliper damage stage | Pads + rotors + caliper(s) | $700–$1,500 | Full rebuild required |

Power Stop Z23 Evolution Sport Brake Kit — Pads + Drilled Rotors
Complete front or rear kit with cross-drilled/slotted rotors and carbon-fiber ceramic pads with integrated wear indicators. Pre-matched for optimal performance.
Check Price on AmazonChoosing Replacement Brake Pads: Material Comparison
Not all brake pads are created equal. The compound used in the friction material determines how the pad performs, how long it lasts, how much brake dust it generates, and critically — how sensitive its own wear indicators need to be for your driving style.
| Pad Material | Stopping Power | Lifespan | Dust | Noise | Best For | Cost |
|---|---|---|---|---|---|---|
| Organic (NAO) | Good | Short (20–40k mi) | Low | Quiet | Light daily driving | $ |
| Semi-Metallic | Excellent | Medium (40–70k mi) | High | Moderate | Most passenger vehicles | $$ |
| Ceramic | Excellent | Long (50–80k mi) | Very Low | Very quiet | Commuters, luxury vehicles | $$$ |
| Low-Metallic NAO | Very Good | Medium-Long | Medium | Low | Balanced daily drivers | $$ |
| Performance / Racing | Exceptional (hot) | Short (track use) | Very High | High | Track/performance driving | $$$$ |
✅ Ceramic Pads — Advantages
- Extremely low brake dust — keeps wheels clean
- Quieter operation than metallic compounds
- Consistent performance across wide temperature range
- Longer lifespan than organic compounds
- Compatible with OEM electronic wear sensors
- Less rotor wear compared to semi-metallic
❌ Ceramic Pads — Limitations
- Higher initial cost than organic or semi-metallic
- Can underperform in extreme cold until warmed up
- Not ideal for heavy towing or track performance
- May not generate enough heat for sensor activation at low temp
- Less “bite” feel than semi-metallic (can feel less responsive)
Matching Pad Type to Your Driving Pattern
Drivers who spend most of their time in city stop-and-go traffic — where frequent, relatively light braking is the norm — get excellent results from ceramic pads. The constant light use stays within the optimal temperature range for ceramic compounds, minimizing dust and maximizing lifespan. Those who do a lot of highway driving, winter driving, or who drive heavier vehicles with more mass to stop may prefer semi-metallic compounds for their broader operating range and stronger stopping power.
Brake Maintenance Schedule: What to Check and When
Brake pads don’t wear on a predictable calendar schedule — they wear based on use, driving style, vehicle weight, terrain, and pad compound. That said, a proactive inspection schedule prevents the wear indicator from being your only line of defense.
| Interval / Event | What to Check | Method | Priority |
|---|---|---|---|
| Every tire rotation (every 5–7k miles) | Pad thickness, rotor condition, visual wear | Visual inspection with wheel off | Routine |
| When squeal is heard | Pad thickness, indicator tab, rotor contact | Inspection + caliper removal if needed | Urgent |
| When warning light appears | Sensor status, fluid level, pad thickness | OBD2 scan + visual inspection | Urgent |
| When grinding is heard | All brake components — full inspection | Do not drive — workshop inspection | Emergency |
| Before long road trips | Visual pad check, brake fluid level | Self-inspection through wheel spokes | Preventive |
| After heavy mountain driving | Pad heat stress, rotor warping, glazing | Feel for vibration, look for discoloration | Recommended |
Brake Fluid: The Often-Overlooked Factor
Brake fluid is hygroscopic — it absorbs moisture from the atmosphere over time. As water content increases, the fluid’s boiling point drops, making brake fade (the temporary reduction in braking force under sustained heavy use) more likely. Most manufacturers recommend brake fluid replacement every two to three years regardless of mileage. If you frequently drive in mountainous terrain, tow trailers, or brake aggressively, this interval should be shortened. This connects directly to understanding the difference between brake fade and hydraulic failure — both are affected by fluid condition.
Proactive Driving Habits That Extend Pad Life
The way you drive is the single biggest variable in brake pad lifespan. Drivers who maintain greater following distances, anticipate stops early, and allow engine braking to slow the vehicle before applying brakes can double or triple pad lifespan compared to aggressive drivers who brake hard from high speed. Learning proper following distance isn’t just about collision avoidance — it’s also the most cost-effective brake maintenance strategy available. Similarly, being thoughtful on highway driving reduces the high-speed hard braking events that cause disproportionate pad wear.

ITEQ Brake Fluid Tester Pen — DOT3/DOT4/DOT5.1 Compatible
LED indicator shows moisture content of brake fluid in 3 seconds — tells you precisely when a fluid flush is needed before performance degrades.
Check Price on AmazonFrequently Asked Questions
-
When you first hear the wear indicator squeal, you typically have somewhere between 1,000 and 3,000 additional miles of conservative driving before the situation becomes dangerous — but this window varies enormously based on driving style, vehicle weight, terrain, and how thin the pads actually are. Treat the squeal as a signal to schedule service within the week, not to budget another few months. Aggressive driving, heavy braking, or mountainous terrain can exhaust that buffer in days rather than weeks.
-
If you catch pad wear early — at the squeal stage or before — and the rotors have no significant grooves, scoring, or warping, you can often replace pads only. However, if the rotors have grooves deeper than about 0.5mm, are below minimum thickness specifications (stamped on the rotor itself), or show heat damage or warping, they should be replaced or resurfaced at the same time. Installing new pads on severely worn rotors reduces pad contact area and shortens the new pads’ lifespan significantly.
-
Morning or cold-weather squealing that disappears after one or two brake applications is almost always caused by a thin layer of surface rust that forms on rotors overnight. Iron in the rotor reacts with moisture and oxygen when the vehicle sits unused, creating a rust film that the brake pads scrape off during the first stop. This is completely normal behavior and not a wear indicator issue. The wear indicator squeal is different: it happens consistently on every braking event regardless of temperature or time of day.
-
Virtually all modern passenger vehicles manufactured for sale in North America, Europe, and most global markets include at least mechanical wear indicator tabs. Many also include electronic sensors. However, older vehicles — particularly those older than 25–30 years — may use pads without any indicator system, or may have had indicators removed or replaced with aftermarket pads that lack them. Drum brake systems (still common on rear axles of budget vehicles) use different wear mechanisms and may not have audible indicators. When in doubt, consult your owner’s manual or have a mechanic inspect the system.
-
A red brake warning light has several possible triggers beyond pad wear. The parking brake being partially engaged is the most common false alarm — even slight engagement on some vehicles triggers the light. Low brake fluid in the reservoir (which could indicate a hydraulic leak or just normal fluid consumption as pads wear and pistons extend) is another common cause. A faulty ABS sensor, a stuck or leaking wheel cylinder, or a malfunctioning brake light switch can also illuminate the warning. An OBD2 scanner that reads brake-related fault codes will usually pinpoint the cause within minutes.
-
Brake pad replacement at a shop typically costs $150–$300 per axle including labor, or $300–$600 for all four wheels. High-performance vehicles or those with complex brake geometries can cost more. DIY pad replacement is manageable for mechanically confident drivers with basic tools (jack stands, torque wrench, caliper wind-back tool) and can reduce the cost to $50–$120 for quality pads. However, mistakes in brake service can be catastrophic. If you haven’t done it before, at least attempt it first on a secondary vehicle or under supervision. For daily drivers where you’re uncertain, the labor cost at a shop is cheap insurance.
-
No — front brakes handle approximately 60–80% of braking load on most passenger vehicles because weight transfers forward during deceleration. This means front pads typically wear twice as fast as rear pads. On a standard commuter vehicle, you might replace front pads twice for every one rear pad replacement. Rear-engine or rear-biased vehicles (some sports cars and certain trucks) can have more even wear distribution. The exception is vehicles with electronically controlled brake bias that distributes braking force more evenly — these can show more uniform wear across all four wheels.
-
Yes — if one pad wears faster or thinner than its counterpart on the opposite wheel, the vehicle can pull toward the side with more braking force during deceleration. This is called brake pull and is always worth investigating. The most common causes include a stuck caliper (which keeps one pad in contact with the rotor constantly, accelerating wear on that side), a collapsed brake hose that traps hydraulic pressure on one side, or contaminated brake fluid causing uneven response. Brake pull can also come from uneven tire pressure, wheel bearing wear, or suspension issues — so a comprehensive inspection is advisable.
-
Some premium ceramic pads, combined with careful driving habits, can approach 80,000 miles or more in ideal conditions — primarily highway driving with gentle, anticipatory braking. Claims of 100,000+ miles should be treated with skepticism, as real-world usage always involves some city driving, variable loads, and incidental hard stops that accelerate wear significantly. The biggest variable isn’t the pad compound — it’s your driving style. Consistent gentle braking and maintaining good following distance can nearly double pad lifespan regardless of compound choice.
-
Practically speaking, these terms are often used interchangeably by mechanics and drivers — the key diagnostic factor isn’t the label but the consistency and circumstances. A high-pitched tone that occurs consistently during braking (regardless of temperature or time of day) points to a wear indicator. A tone that appears at low speeds or light pedal pressure but not under hard braking can indicate glazed pads. A tone that’s random, intermittent, or accompanies vibration points to rotor surface issues. The grinding sound — a distinctly lower-pitched, more abrasive tone — is categorically different and means immediate action is required.
Your Brakes Spoke. Did You Listen?
Understanding brake pad wear indicators isn’t just technical knowledge — it’s the difference between a routine service appointment and a roadside emergency. The system is designed to give you multiple warnings, in multiple forms, with plenty of lead time. All you have to do is pay attention to them.
Check your pads at every tire rotation. Respond to any squealing within the week. Replace at grinding sounds before you move the car another mile. And use the right replacement compound for your driving style.
Safe braking starts with knowing what your car is telling you.
Explore All Defensive Driving Guides →