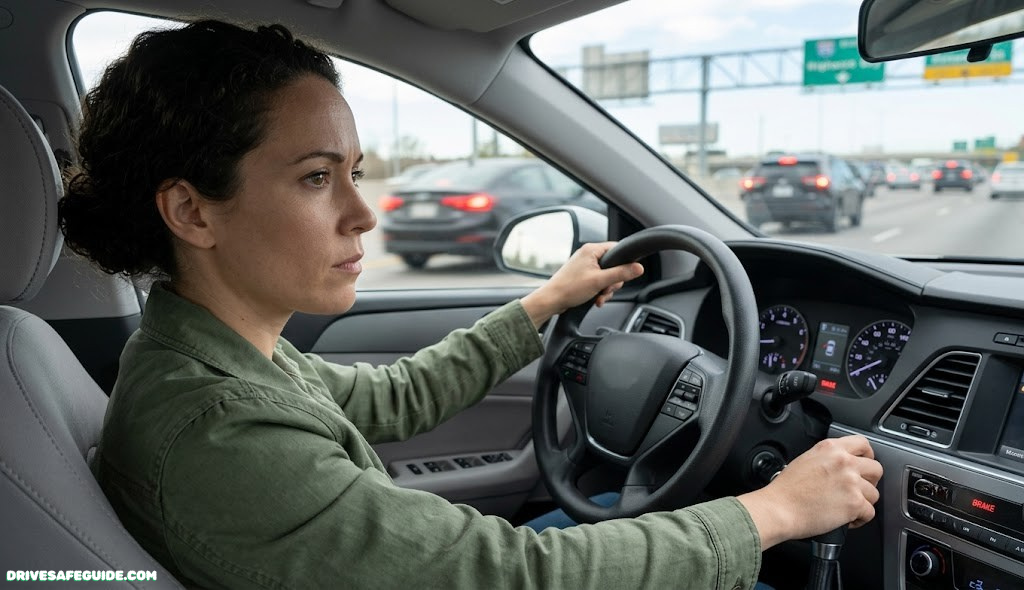
Brake Failure Emergency Procedures: Stay Safe on the Road
If your pedal ever sinks to the floor or your brakes stop responding, the next fifteen seconds decide the outcome. Here is exactly what to do, in order.
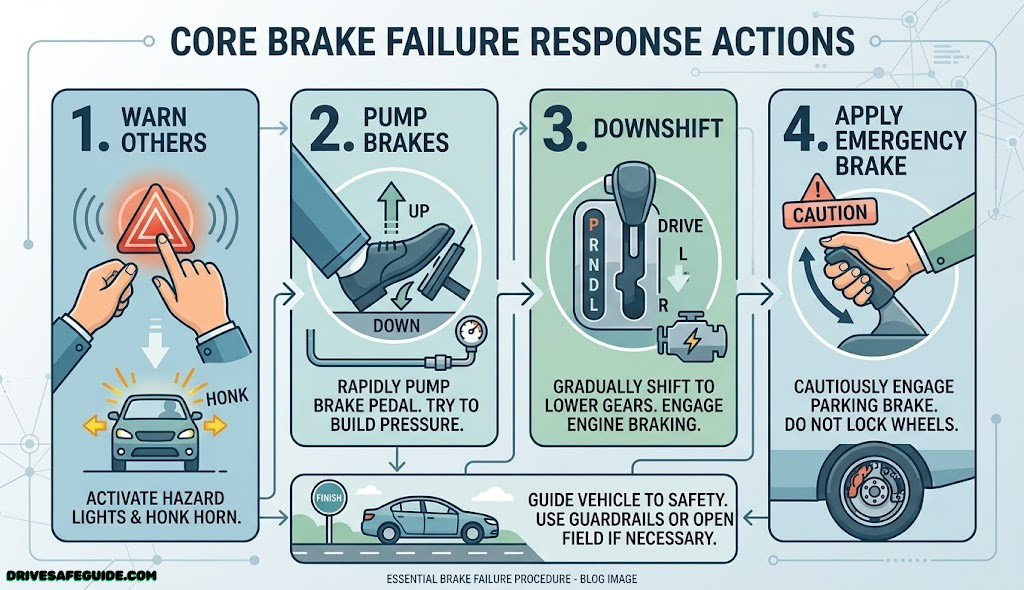
The four actions that matter most, condensed into one sequence you can memorize before you ever need it.
Total brake failure is rare, but it is not a myth invented for driver’s ed videos. Master cylinders leak, brake lines corrode, calipers seize, and on long mountain descents, brake fade can turn a firm pedal into a mushy, useless one within a few hundred meters. What separates a frightening story from a serious crash is almost never luck — it is whether the driver already knows the sequence of actions to take before the adrenaline hits.
This guide walks through that sequence in the order you should actually perform it, explains the difference between the two main types of failure so you respond correctly to each, and covers what to do once the car is stopped. If you want the mechanical side of the story, our companion piece on brake fade vs hydraulic failure breaks down the two failure modes in more technical depth. For now, treat this as the procedure to commit to memory.
None of what follows requires special training, a performance-driving background, or expensive equipment. It requires knowing the order of operations before your heart rate spikes and your normal decision-making narrows to whatever is already familiar. Read it once carefully now, and it will be there when you need it, without having to think your way through it from first principles at highway speed.
Why Brakes Fail Without Warning
Modern braking systems are built with redundancy on purpose. Most cars split the hydraulic circuit diagonally, so a single leak typically leaves you with reduced stopping power in two wheels rather than none at all. Total, simultaneous failure of every wheel is uncommon — but partial failure that feels total to a startled driver happens far more often, and it deserves the same calm, practiced response.
There are three broad categories worth understanding, because each one calls for a slightly different reaction:
- Hydraulic failure. A ruptured brake line, a failed master cylinder seal, or a caliper that has blown a seal lets fluid escape the closed system. Air enters where fluid should be, and the pedal sinks toward the floor with little resistance. This is usually sudden and total on the affected circuit.
- Brake fade. Riding the brakes down a long grade heats the pads and rotors past their effective operating range, or boils the brake fluid itself. The pedal stays firm at first, then gradually goes soft and less effective as heat builds. It is progressive rather than instant, which is exactly why so many drivers get caught off guard by it — they assume it will hold “just a little longer.”
- Mechanical or linkage failure. A snapped cable, a disconnected pedal linkage, or a seized caliper on an older vehicle can remove pedal feel entirely, or make one side of the car pull hard while the other does nothing.
Whichever category you are dealing with, the initial response is almost identical, and that is good news — you do not need to diagnose the failure mode mid-emergency. You need to execute a sequence. Warning signs often show up long before a full failure, which is why we cover brake pad wear indicators in detail separately; catching a thin pad or a soft pedal during routine driving is always preferable to discovering it at 65 mph.
How ABS and power brake assist change the picture
Two systems most drivers never think about until something goes wrong are the anti-lock braking system (ABS) and the vacuum or electric brake booster. ABS modulates pressure at each wheel dozens of times per second to prevent lockup, but it can only work with whatever hydraulic pressure actually reaches the calipers — if that pressure is gone because of a leak, ABS has nothing left to modulate. The booster, meanwhile, is what makes a firm push on the pedal translate into strong stopping force with relatively little leg effort. When a booster fails on its own, independent of the hydraulic circuit, the pedal will usually still stop the car, but it will feel dramatically harder to push, almost like pressing through wet concrete. Recognizing that particular sensation — a hard pedal producing a weak result, rather than a soft or sinking one — is a useful clue that you’re dealing with a booster issue rather than a fluid leak, though the response sequence in this guide still applies either way.
It also helps to understand why manufacturers split hydraulic circuits diagonally rather than front-to-back. A diagonal split means one working circuit always includes at least one front wheel, which carries the majority of braking force under the weight transfer that happens during deceleration. This is a deliberate design choice that keeps a single-circuit failure survivable in the overwhelming majority of cases, rather than leaving you with, say, only the two rear wheels doing all the work while both front wheels do nothing.
The First 3 Seconds: Your Reaction Sequence
The single most damaging thing a driver can do when the pedal fails to respond is freeze. Three seconds of hesitation at highway speed covers well over a hundred meters of unmanaged road. Before anything else, run this three-part sequence in your head — it should become close to automatic:
- Ease off the accelerator immediately. This alone starts slowing the car through drag and engine braking, and buys you time to think.
- Pump the brake pedal rapidly. On most vehicles, especially anything with a hydraulic leak rather than a total master cylinder failure, several fast pumps can rebuild enough pressure in the working circuit to regain partial braking. This does not work on every failure mode, but it costs nothing to try in the first second.
- Signal and check your mirrors before you commit to any lane change. Other drivers around you have no idea anything is wrong. A sudden, unsignaled swerve to find open road can turn one problem into two.
Only after this three-part check is exhausted do you move to the parking brake, downshifting, and looking for an escape route — all of which are covered in the full step-by-step sequence below. The goal of these first three seconds is not to solve the problem. It is to buy the seconds you need to solve it properly.
Highway speed versus city traffic
The urgency of those three seconds changes depending on where you are. At highway speed, the same three-second delay covers well over a hundred meters, but you typically have more open lane space and a wider shoulder to work with, which gives the downshift-and-runoff strategy more room to succeed. In dense city traffic, speeds are lower, but the margin for error shrinks in a different way — cross traffic, pedestrians, and parked cars leave far less room to maneuver toward open ground. In that setting, leaning harder on the parking brake and horn together, while scanning for the most open gap rather than the “best” runoff, tends to produce a better outcome than trying to find an ideal spot that doesn’t exist at low speed in tight quarters.

Brake Fluid Moisture Tester
A five-second dip test that flags moisture-contaminated fluid — one of the leading causes of soft, fading pedals — before it turns into a roadside emergency.
Check Price on AmazonStep-by-Step: What to Do When Brakes Fail
Once the first three seconds are behind you and the pedal still is not responding the way it should, move through this sequence deliberately. Each step assumes the previous one did not fully resolve the problem — in many real incidents, you will not need to reach the final steps at all.
- Stay off the accelerator and keep pumping the brake. Continue rebuilding pressure. On vehicles with a partially intact hydraulic circuit, this can restore meaningful stopping power within a few pumps.
- Shift into a lower gear. Automatic or manual, dropping a gear (or two) increases engine braking and slows the car without relying on the friction brakes at all. We cover the mechanics of this in detail further down.
- Apply the parking brake gradually, not in one yank. A hard, sudden pull on the parking brake — especially at speed — can lock the rear wheels and send the car into a spin. Applied smoothly and progressively, it is one of your most effective remaining tools.
- Move toward the shoulder or slowest lane while braking is still partially available. Do this early rather than waiting until you have no options left. Use your signal; other drivers need the warning.
- Turn on your hazard lights as soon as you have a hand free. This should happen as early as safely possible, not as an afterthought once you’ve stopped.
- Look for a purpose-built runoff, or terrain that will slow you naturally. An uphill grade, a grass median, or a designated truck escape ramp will all scrub speed far faster and more safely than open, flat pavement.
- As a genuine last resort, use light, controlled contact with a low-speed obstacle. A guardrail brushed at a shallow angle, a hedge, or soft shoulder vegetation is a far better outcome than a high-speed collision with cross traffic or a solid structure. This step exists for the scenario where every other option has been exhausted — it is not an early-stage choice.
- Once stopped, keep the car in gear (or in Park) and set the parking brake fully. Do not attempt to restart the drive until the vehicle has been inspected.
If the failure happens on a long descent rather than on flat ground, pair this sequence with the guidance in our black ice driving survival piece — many of the same steering and weight-transfer principles apply when traction is already compromised by a grade or slick surface.
Why the order of these steps matters
It can be tempting to jump straight to the parking brake or to swerving toward a shoulder the instant the pedal fails to respond, but the order above is deliberate. Pumping the pedal first costs almost nothing and can resolve a surprising number of partial hydraulic issues on its own within a second or two. Shifting down comes next because it requires only a hand and does not commit you to any change in road position yet. Only once those two low-risk actions are underway does the sequence move to the parking brake, which carries a small risk of destabilizing the rear end if mishandled, and finally to an actual change in lane or road position, which is the step most likely to surprise other drivers around you. Working through the sequence in this order means that by the time you need to make a bigger, riskier decision, you’ve already reduced your speed and improved your control, so that decision is being made from a safer starting point than the one you began with.
Using the Parking Brake Correctly
The parking brake (sometimes still called the emergency brake for exactly this reason) operates on a separate mechanical cable system in most vehicles, independent of the hydraulic circuit that just failed you. That independence is precisely why it remains one of your most reliable tools during a hydraulic failure — it does not care that your master cylinder has a leak.
The technique matters as much as the tool itself:
- Apply it in stages, not one full pull. A hard, instant application at speed can lock the rear wheels, and locked rear wheels are what cause a spin — especially on anything less than a bone-dry, high-grip surface.
- Keep both hands ready to correct steering. If you feel the rear end start to step out, ease off slightly rather than fighting it with more brake.
- On a foot-operated parking brake, press it down firmly but be prepared to release quickly if the car begins to yaw.
- On an electronic parking brake button, most modern systems are designed to modulate pressure automatically even under a hard pull, which makes them somewhat more forgiving — but the same principle of holding steering control still applies.
Practicing this — even just once, in an empty parking lot at low speed with your owner’s manual open — removes a huge amount of hesitation from the moment you actually need it. This pairs naturally with general skid control techniques, since an aggressive parking-brake application and an unintentional skid share the same recovery inputs.
Downshifting to Slow the Car
Downshifting converts your engine into a speed-reducing device by forcing it to spin faster than the car’s momentum alone would demand, creating drag through the drivetrain. It will not stop a car the way brakes do, but combined with the parking brake and a runoff strategy, it materially shortens your stopping distance.
In a manual transmission
Downshift one gear at a time rather than skipping straight to first. Jumping from fifth to second at speed can lock the drive wheels and cause a skid, particularly on a wet or gravel shoulder. Match engine speed with a light rev on the way down if you have the composure to do it, though even a rougher downshift is far better than staying in a high gear.
In an automatic transmission
Move the shifter into the manual/sport gate, or into “L,” “2,” or “1” depending on what your vehicle offers, and step down through the gears the same way — one at a time. Many modern automatics also have paddle shifters that let you do this without taking a hand off the wheel, which is a meaningful advantage in an emergency where hand position matters.
Why Downshifting Helps
- Works even with zero hydraulic brake pressure remaining
- Reduces the load you’re asking the parking brake to handle alone
- Available on every gear-equipped vehicle, no special hardware needed
Its Limits
- Slows the car — it does not stop it on its own
- Aggressive downshifts at high speed risk wheel lockup
- Less effective on vehicles with a freewheeling automatic in low gears
Engine Braking Explained
Engine braking is simply the deceleration your car experiences the moment you lift off the accelerator, amplified by shifting into a lower gear. Trucks use a much more aggressive version of this — the loud “jake brake” you hear on long highway grades — but every gasoline or diesel passenger car benefits from the same underlying principle on a smaller scale.
The physics are straightforward: a lower gear forces the engine to turn at a higher RPM for a given road speed. Because the engine resists spinning faster than the fuel and air being fed to it can support, that resistance transmits back through the drivetrain as deceleration. No brake pads, no hydraulic fluid, and no electronics are involved at all, which is exactly why it remains available during a total hydraulic failure.
Engine braking works best when it is layered with the other steps in this guide rather than relied on alone. Downshift progressively while you are also easing toward a lower-traffic lane, applying the parking brake gradually, and scanning ahead for a natural runoff. Together, these create a compounding deceleration effect that a single technique cannot match.
What about electric and hybrid vehicles?
Electric and hybrid vehicles have an additional tool that gasoline-only cars don’t: regenerative braking. Lifting off the accelerator on most EVs and hybrids triggers the motor to act as a generator, converting the car’s momentum into electricity and, in the process, creating a noticeably stronger deceleration than engine braking alone provides in a traditional car. If your brake pedal fails in an EV, lifting fully off the accelerator and, where available, increasing the regenerative braking level through the vehicle’s drive-mode settings, can produce meaningful slowing without touching the friction brakes at all. It is not a full substitute for the parking brake or a proper runoff strategy, but it is a genuinely useful layer that gasoline-only drivers don’t have access to.
| Technique | Stopping Power | Works With Zero Hydraulic Pressure? | Risk if Misused |
|---|---|---|---|
| Pumping the brake pedal | Low–Moderate | Partially | Minimal |
| Parking brake (gradual) | Moderate–High | Yes | Rear-wheel lockup/spin if yanked |
| Downshifting | Low–Moderate | Yes | Drive-wheel lockup if too aggressive |
| Runoff/terrain use | High | Yes | Loss of control on uneven ground |
| Controlled low-speed contact | Very High | Yes | Vehicle damage; last resort only |

Seatbelt Cutter & Window Breaker
If a brake emergency ends in a collision, a spring-loaded window breaker and seatbelt cutter clipped to your visor can shave critical seconds off getting out.
Check Price on AmazonFinding a Safe Runoff Area
While you are pumping the brake, downshifting, and easing the parking brake on, part of your attention needs to go toward scanning the road ahead for terrain that will help rather than hurt you. This is where situational awareness built from ordinary defensive driving habits pays off — drivers who already scan several seconds ahead as a matter of routine find usable runoff options faster under pressure.
Good options, roughly in order of preference:
- A dedicated truck escape ramp, if you are on a mountain grade where one is signed. These are built from loose gravel or sand specifically to absorb momentum safely; our dedicated piece on runaway truck escape ramps covers exactly how to use one correctly.
- An uphill grade or on-ramp. Gravity works in your favor here, slowing the car with zero mechanical input required.
- A wide, flat shoulder or grass median, away from guardrails, signs, or parked vehicles.
- An empty side road or parking lot, if your speed and position allow you to reach one safely.
- Loose gravel or dirt shoulder, which increases rolling resistance and slows the car passively.
Whichever option you choose, commit to it early and signal your intent to nearby traffic with your indicator and hazard lights. A late, sharp swerve toward a runoff is more dangerous than a slightly less ideal option approached smoothly and with warning.
Reading the road a few seconds ahead of where you are
Good runoff selection is really a habit of looking further down the road than most drivers naturally do, and it pays off well beyond brake emergencies. Notice where the shoulder widens, where a median opens into flat grass rather than a drainage ditch, and where guardrails give way to open field, even on drives where nothing is wrong. That mental map, built during ordinary trips, is exactly what you’ll draw on in the few seconds you have to choose a runoff during an actual failure. Drivers who make a habit of this kind of ongoing scanning tend to identify a usable option faster under stress simply because they’re not searching from scratch — they’re recalling something they’d already half-noticed a moment earlier.
What NOT to Do During Brake Failure
Almost as important as the correct sequence is knowing which instincts to override. These reactions feel natural in the moment but consistently make outcomes worse:
| Instinct | Why It Backfires |
|---|---|
| Slamming the parking brake on hard, all at once | Locks the rear wheels, often triggering a spin rather than a controlled slowdown |
| Turning the engine off immediately | Disables power steering (and often power brake assist) while the car is still moving |
| Shifting straight to first gear at highway speed | Risks locking the drive wheels and losing directional control |
| Swerving hard without checking mirrors | Surrounding drivers have no warning; this can cause a secondary collision |
| Fixating on the brake pedal instead of scanning ahead | Wastes seconds you need for finding a runoff and managing steering |
| Aiming deliberately for a “soft-looking” object at full speed | Controlled, shallow contact only works at already-reduced speed, not as a first response |
If the failure happens in poor conditions rather than on a clear, dry road, the margin for error shrinks further. Reviewing how power steering failure compounds a braking emergency, or how a hood flying open mid-drive demands a similar staged response, is worth doing before you’re ever in either situation — the calm-under-pressure skill transfers between emergencies.
Notice that nearly every item on this list shares a common thread: they are all fast, forceful, single-motion reactions to a slow-developing or already-underway problem. A staged, incremental response almost always outperforms a single dramatic one, because it leaves you room to adjust as you learn more about how the car is actually behaving in that moment, rather than committing fully to one action before you know whether it’s working.
Brake Fade vs. Hydraulic Failure: Key Differences
Because the two most common failure types feel different as they develop, recognizing which one you’re dealing with — even mid-emergency — helps you weight your response correctly.
| Signal | Brake Fade | Hydraulic Failure |
|---|---|---|
| Onset | Gradual, over seconds to a couple of minutes | Sudden, often within one pedal press |
| Pedal feel | Firm at first, progressively softer and lower | Sinks toward the floor almost immediately |
| Common cause | Overheated pads/rotors or boiling fluid on long descents | Ruptured line, failed seal, or master cylinder fault |
| Best immediate response | Downshift early, avoid continuous braking, let components cool if possible | Pump pedal rapidly, apply parking brake gradually, downshift |
| Recovery once stopped | Often partially recoverable after a cool-down period | Will not self-recover; requires repair before driving again |
For a deeper technical breakdown of both mechanisms, including how each one develops at the component level, see our dedicated guide on brake fade vs hydraulic failure.
After the Emergency: Next Steps
Getting the car stopped safely is only the first half of the incident. What you do in the following minutes and days determines whether the problem gets properly fixed or quietly recurs.
- Do not restart the drive. Even if the pedal feels normal again after a cool-down (common with brake fade), the underlying cause has not been fixed.
- Call for a tow rather than attempt to limp home. A brake system that failed once under normal driving conditions cannot be trusted for the return trip.
- Note exactly what happened, in order. Was the pedal soft before it failed, or did it fail all at once? Was it after a long downhill stretch, or on flat ground? This detail matters enormously to whoever inspects the car.
- Have the fluid, lines, and pads inspected before any other repair. Do not let a shop simply top off fluid and send you on your way without identifying the root cause.
- Report a near-miss to passengers or nearby drivers if it affected them, and exchange information as you would with any other traffic incident if contact occurred.
If the incident involved any impact at all, even minor, treat it the same way you would treat recovering from a submersion or serious collision — assess for injuries first, and don’t assume the car is drivable just because the engine still runs. Our guide on vehicle submersion escape covers a more extreme version of this same “assess before you act” principle if the incident ends somewhere unusual.
Documenting the incident properly
If you have a phone with you, take a few photos of the vehicle’s position, any visible fluid leaking beneath it, and the general road conditions before anything is moved. This matters for two separate reasons. First, if the brake failure was caused by a recent repair — a botched pad replacement, a line that wasn’t properly bled, or a caliper reinstalled incorrectly — that documentation can matter a great deal if the shop disputes responsibility. Second, even when no other vehicle or property was involved, a written record of exactly what the pedal felt like, in what order the symptoms appeared, and how far you traveled before stopping gives a mechanic far more to work with than a vague description recalled days later under less stress. Treat the few minutes right after the car is stopped as valuable evidence-gathering time, not just a moment to catch your breath.
Preventing Brake Failure
The best brake failure procedure is the one you never have to use. Nearly every hydraulic failure and most brake fade incidents are preceded by warning signs that get ignored, dismissed, or simply not noticed because nobody was looking for them.
Watch for these warning signs
- A pedal that sinks lower than usual, or feels spongy rather than firm — covered in detail in brake pad wear indicators.
- A high-pitched squeal or metallic grinding when braking, which usually indicates worn pad material or a wear indicator tab doing exactly its job.
- The car pulling to one side under braking, suggesting uneven pad wear or a caliper issue on one wheel.
- A burning smell after a long descent, a classic sign that fade has already begun.
- A dashboard brake warning light, which should never be treated as optional to investigate.
Build these habits into routine maintenance
- Flush and replace brake fluid on the schedule your manufacturer recommends — old fluid absorbs moisture over time, lowering its boiling point and making fade more likely.
- Inspect pads and rotors at every tire rotation, not just when a noise appears.
- On long mountain descents, use a lower gear from the start rather than riding the brakes continuously — this alone prevents the majority of fade incidents.
- Keep a basic diagnostic tool on hand; many modern vehicles will log brake-system-adjacent codes long before a failure becomes obvious to the driver. See our comparison of OBD2 scan tools with real-time sensor monitoring if you want to catch issues early.
A quick word on brake fluid types
Not all brake fluid behaves the same way under heat, and mixing up the type your vehicle actually calls for can quietly set the stage for fade. DOT 3 and DOT 4 are both glycol-based and absorb moisture from the air over time, which is exactly why a scheduled flush matters even if nothing seems wrong. DOT 4 has a meaningfully higher boiling point than DOT 3, which is part of why some manufacturers specify it for vehicles more prone to heat buildup, such as those with heavier curb weight or a sportier braking setup. DOT 5 is silicone-based, does not absorb water the same way, and is not interchangeable with DOT 3 or DOT 4 in most systems — mixing it in can damage seals designed for glycol-based fluid. Always check your owner’s manual or the cap on the master cylinder reservoir itself before a flush, rather than assuming any bottle labeled “brake fluid” on a store shelf is a safe match.
Seasonal checks that catch problems early
Brake systems don’t fail on a perfectly even schedule throughout the year. Before a hot summer road trip, check fluid condition and pad thickness, since sustained highway speeds and heavier luggage loads both increase demand on the system. Before winter, confirm the parking brake cable moves freely rather than sticking, since cold temperatures can make a marginal cable noticeably stiffer right when you might need it most. A five-minute check twice a year catches the majority of developing issues before they ever reach the point of an on-road emergency.

Bluetooth OBD2 Diagnostic Scanner
Real-time sensor monitoring can flag ABS and brake-system fault codes days or weeks before a driver would ever feel a change in pedal response.
Check Price on AmazonYour Brake-Failure Emergency Kit
A handful of inexpensive tools, kept in the car rather than in a drawer at home, make both the emergency itself and the aftermath meaningfully safer. If you haven’t put one together yet, our full guide on how to build a car safety kit covers the complete list beyond just brake-related items.
- Reflective road flares or LED beacons, to warn approaching traffic the moment you’re stopped on a shoulder.
- A basic brake fluid test strip or moisture tester, so you catch degraded fluid on your own schedule, not the road’s.
- A seatbelt cutter and window breaker, in case a brake emergency ends in a collision rather than a controlled stop.
- A compact fire extinguisher rated for vehicle use, since overheated brake components have, in rare cases, been linked to smoke or fire.
- A phone mount and charging cable, so you can call for a tow and share your exact location without fumbling.
Kept In the Car
- Available instantly, no delay
- Doesn’t rely on cell signal or roadside assistance arriving first
- Works the same at 2am on a rural road as it does downtown
Left At Home
- Useless exactly when it’s needed most
- Forces reliance on other drivers or emergency services alone
- Common mistake even among otherwise careful drivers
None of these items need to take up much space. A small pouch in the glovebox or under a seat is enough for the flares, tester strip, and cutter tool, while a compact extinguisher usually mounts under a seat or in the trunk with a simple bracket. The value isn’t in how elaborate the kit is — it’s in whether it’s actually there, already in the car, the one time it matters. Building this kit alongside a broader emergency-preparedness routine, rather than treating brake failure as an isolated risk, tends to produce drivers who react more calmly across a whole range of roadside surprises, not just this one.
Frequently Asked Questions
What is the very first thing I should do if my brakes fail?
Ease off the accelerator immediately and pump the brake pedal rapidly. On many vehicles, especially those with a partial hydraulic leak rather than total failure, pumping can rebuild enough pressure to regain some stopping power within the first second or two.
Should I turn off the engine if my brakes stop working?
Not while the car is still moving, unless every other option has already been exhausted. Shutting off the engine mid-drive typically disables power steering and, on many vehicles, power brake assist, making the car harder to control at the exact moment you need more control, not less.
Can I use the parking brake to stop a moving car?
Yes, and it is one of your most reliable tools, since it usually runs on a separate mechanical cable rather than the hydraulic system that just failed. Apply it gradually rather than yanking it all at once — a hard, sudden pull can lock the rear wheels and cause a spin.
Will downshifting actually slow the car down?
Yes, through engine braking. Dropping into a lower gear forces the engine to resist spinning faster than the car’s momentum demands, creating drag through the drivetrain. It won’t stop the car alone, but combined with the parking brake and a runoff strategy, it meaningfully shortens stopping distance.
What’s the difference between brake fade and a full hydraulic failure?
Brake fade develops gradually, usually after prolonged braking on a long descent, and the pedal goes from firm to progressively softer. Hydraulic failure is typically sudden — the pedal sinks toward the floor almost immediately due to a leak or seal failure. Fade sometimes partially recovers after cooling; hydraulic failure will not self-correct and requires repair.
Is it ever okay to intentionally hit something to stop the car?
Only as a genuine last resort, once every other option — pumping the brakes, the parking brake, downshifting, and finding a runoff — has been exhausted. Light, shallow contact with something forgiving, like roadside vegetation or a low-speed graze along a guardrail, is far preferable to a high-speed collision, but it is not an early-stage choice.
Why does my brake pedal feel spongy before a failure happens?
A spongy or gradually sinking pedal is one of the most common early indicators of air or moisture in the brake lines, or fluid that has absorbed enough water over time to lower its boiling point. It’s a warning sign worth acting on immediately rather than waiting to see if it worsens.
What should I do immediately after getting the car safely stopped?
Do not attempt to continue driving, even if the pedal feels normal again. Call for a tow, note exactly how the failure developed, and have the fluid, lines, and pads inspected before any other repair is made.
Can regular maintenance actually prevent brake failure?
In most cases, yes. Routine fluid flushes on the manufacturer’s schedule, pad and rotor inspection at every tire rotation, and using lower gears rather than riding the brakes on long descents address the majority of causes behind both hydraulic failure and brake fade.
Does this same sequence apply to an automatic transmission car?
Yes. Instead of manually stepping through gears with a clutch, move the shifter into the manual/sport gate or into a lower gear range such as “L,” “2,” or “1,” and step down through the gears the same way — one at a time rather than skipping straight to the lowest option.
How common is total brake failure compared to partial failure?
Total, simultaneous failure across every wheel is uncommon, largely because most vehicles split the hydraulic circuit into two independent halves for exactly this reason. Partial failure that reduces stopping power on part of the system is more common, but it can feel just as alarming, which is why the same calm, staged response applies to both.
What should be in a car emergency kit specifically for brake problems?
At minimum: reflective flares or LED beacons, a brake fluid moisture tester, a seatbelt cutter and window breaker, a compact vehicle-rated fire extinguisher, and a phone mount with a charging cable so you can call for a tow and share your location quickly.
The Sequence Is Simple. Knowing It Cold Is What Matters.
Total brake failure is frightening precisely because it removes the tool you rely on more than any other while driving. But the response to it is not complicated: ease off the throttle, pump the pedal, apply the parking brake gradually, downshift, signal your intent, and steer toward whatever terrain will slow you down safely. None of these steps require special equipment or advanced skill — they require you to have already decided, calmly, what you’ll do before the moment arrives.
Read through this sequence again before your next long drive, especially before a mountain descent or a road trip where a worn brake system won’t get caught until it’s tested hard. Pair it with a proper car safety kit and routine attention to brake pad wear indicators, and the odds of ever needing this guide in the first place drop substantially. Share it with a new driver in your life, too — this is exactly the kind of knowledge that’s far more useful learned calmly at home than discovered for the first time in the middle of an actual emergency.
Build Your Emergency Kit on Amazon🛡️ Be Prepared
Every Car Needs an Emergency Kit
Breakdowns happen without warning. A well-stocked car emergency kit can keep you safe until help arrives — don’t drive without one.
🏗 Shop Emergency Kits on AmazonAffiliate link — we earn a small commission that keeps DriveSafeGuide running. Thank you!