How to Flush a Radiator at Home: A Step-by-Step Guide
Old coolant turns acidic, picks up rust, and stops protecting your engine long before it looks obviously dirty. Here’s exactly how to drain it, clean the system, and refill it correctly — on a driveway, with hand tools, in an afternoon.
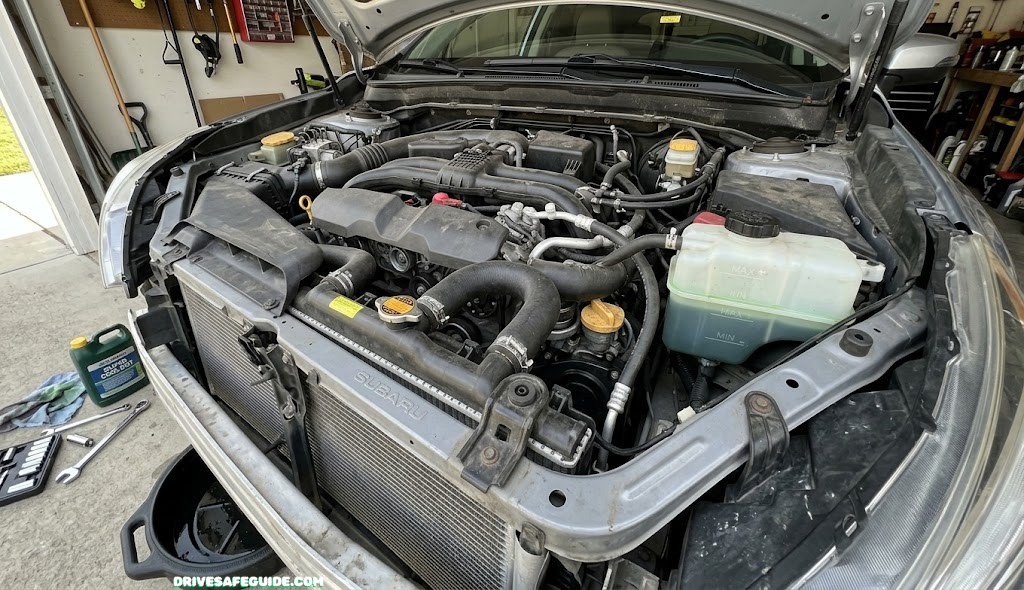
Every time your engine runs, the coolant inside it is doing quiet, unglamorous work: pulling heat away from the block, cycling through the radiator to shed that heat into the air, and coating the inside of every metal passage with a thin film of corrosion inhibitors. That film wears out. So does the fluid’s ability to resist freezing and boiling. Eventually the coolant that’s supposed to be protecting your engine starts doing the opposite — carrying rust, scale, and sediment into places it doesn’t belong.
A radiator flush is how you reset that whole system. It’s not glamorous work either, but it’s genuinely one of the more approachable DIY jobs on a modern car, and skipping it for too long is one of the more common ways a healthy engine turns into an expensive one. If you’ve never done this before, budget an afternoon, a flat driveway, and a willingness to get a little coolant on your hands (with gloves on, please). Below is the full process, start to finish, plus the coolant-chemistry details most guides skip and the safety points that actually matter.
This guide is written for anyone comfortable popping the hood and using basic hand tools, regardless of whether you’ve worked on cooling systems before. You don’t need a lift, a scan tool, or specialty equipment for the standard method — just patience around the cooldown period and attention to which coolant your specific vehicle actually calls for. If your car has a known leak, a suspected head gasket issue, or a cooling system that’s already acting up mechanically, a flush is still useful maintenance, but it won’t fix those underlying problems on its own; we’ll flag where that distinction matters as it comes up.
If your car is already overheating on the highway or showing warning signs on a long drive, it’s worth reviewing what to do during a desert breakdown before you’re stuck somewhere with no shoulder to pull onto.
How Your Cooling System Actually Works
It helps to have the basic layout in your head before you start pulling hoses and opening caps, since almost every step below refers back to one of these four parts.
Coolant is pumped out of the engine block, where it has just absorbed heat from the cylinders, and pushed through the radiator — the finned metal core mounted at the front of the car. As air passes through those fins, usually helped along by the fan, the coolant gives up its heat and comes out the other side noticeably cooler, ready to head back into the engine and pick up more.
Sitting between the radiator and the engine is the thermostat, a small valve that stays closed while the engine is cold so it can warm up quickly, then opens once it reaches operating temperature to let the full volume of coolant start circulating. This is exactly why the steps in this guide that call for running the engine with the heater on max work: they’re using the thermostat’s own logic to pull cleaning solution, rinse water, and eventually fresh coolant through the entire loop, not just the parts near the fill neck.
The heater core is a second, smaller radiator tucked behind the dashboard. Hot coolant runs through it, a fan blows cabin air across it, and that’s where your car’s heat actually comes from — which is also why a cold heater is often the very first symptom of trapped air or low coolant, well before the temperature gauge shows anything unusual.
Finally, the radiator cap (or, on many modern cars, a pressurized cap on a separate coolant reservoir) keeps the whole system sealed under pressure, typically somewhere around 14–16 psi. That pressure raises the boiling point of the coolant well above what it would be in an open container, which is exactly why the system stays dangerously hot longer than you’d expect, and why every guide you read — including this one — puts so much emphasis on letting it cool before you open anything.
With those four parts in mind, the rest of this guide should read less like a list of arbitrary instructions and more like a logical sequence: drain the loop, clean the loop, rinse the loop, refill the loop, then purge the air that got in while the loop was open.
Signs Your Radiator Actually Needs a Flush
Coolant doesn’t send up a flare when it goes bad. It fades quietly, and most drivers only notice once one of these shows up:
- The color has shifted. Fresh coolant is vibrant — green, orange, pink, or blue depending on the formula. If it’s turned brown, rusty, or cloudy, it has picked up corrosion byproducts and lost most of its protective additives.
- The temperature gauge creeps up in stop-and-go traffic or climbs faster than it used to on hills.
- The heater blows lukewarm air even with the temperature set to max, which often means reduced coolant flow through the heater core.
- You spot sediment or grit when you check the reservoir, or the fluid feels gritty between your (gloved) fingers.
- There’s a sweet smell near the front of the car, which usually points to a small coolant leak rather than the flush itself, but is worth investigating at the same time.
- It’s simply been years since the last change, regardless of how the coolant looks. Additive packages deplete even when the color still seems fine.
Is a “Flush” the Same Thing as a Coolant Change?
Not quite, and the distinction matters for how thorough you need to be. A coolant change is just draining what’s in the system and pouring in fresh fluid — quick, but it leaves behind whatever rust, scale, and old-additive residue is clinging to the radiator walls and engine passages. A flush adds a cleaning stage in between: you circulate a cleaning solution (or plain distilled water) through the system before the final refill, so the sediment actually leaves the car instead of mixing with your new coolant.
If your coolant still looks reasonably clean and you’re just doing routine maintenance on schedule, a straight change is often enough. If the fluid has gone brown, if you’re switching coolant types, or if the car has gone well past its recommended interval, do the full flush described in this guide — a change alone won’t remove what’s already built up inside the block and radiator core.
There’s also a time-and-money tradeoff worth naming honestly: a straight change takes less time and uses less fluid, since you’re not running a cleaning solution through and draining it a second time. If your only goal is topping up aging-but-otherwise-fine coolant on a car with a clean maintenance history, that shortcut is a reasonable call. The full flush earns its extra thirty minutes on cars with any uncertainty in their history — unknown coolant type, a long-overdue interval, or visible contamination.
Safety Precautions to Take First
This job is low-risk compared to most engine work, but the two ways people actually get hurt doing it are both preventable:
- Never open a warm or hot radiator. The cooling system runs under pressure while the engine is warm, and a hot cap can send scalding coolant several feet. Park the car and let it sit untouched for at least an hour — longer if it’s been driven hard — before you crack the cap.
- Treat coolant as a poison, because it is one. Ethylene glycol has a sweet taste that pets and wildlife find genuinely irresistible, and it doesn’t take much to be lethal to a small animal. Wear nitrile gloves, work over a pan rather than open ground, and never leave a container or puddle unattended, even for a minute.
A few more basics: work on level ground so drained fluid actually reaches your pan instead of running under the car, keep the work area ventilated if you’re running the engine in a garage, and have rags on hand — this job is messier than most people expect.
Coolant is toxic on contact and this is a bare-minimum safety layer for the whole job.
Check Price on AmazonIf you’re doing this job as part of a broader “get the car road-trip ready” pass, it’s worth cross-checking your pre-road-trip safety checklist at the same time, since coolant condition is usually on that list anyway.
Know Your Coolant Type Before You Buy Anything
This is the step most tutorials skip, and it’s the one that actually causes engine damage when it’s ignored. Coolant isn’t one universal fluid with different food-coloring added — the additive packages are chemically different, and mixing the wrong two together doesn’t just dilute protection, it can turn the mixture into a gel that clogs your radiator and heater core from the inside.
| Type | Typical Color | Common In | Rough Service Life |
|---|---|---|---|
| IAT (Inorganic Additive Technology) | Green | Older vehicles with cast-iron or copper/brass components | ~2 years / 24,000–30,000 mi |
| OAT (Organic Acid Technology) | Orange, pink, red, purple | Many GM, VW, Honda, Chrysler models with aluminum engines | ~5 years / up to 150,000 mi |
| HOAT (Hybrid OAT) | Yellow, turquoise, blue | Many Chrysler, Mercedes, and European models | ~5 years / 100,000–150,000 mi |
| P-HOAT (Phosphated HOAT) | Pink, blue, red | Many Toyota, Honda, Hyundai, Kia, Nissan models | ~5 years / 100,000–150,000 mi |
Check your owner’s manual or the cap on your existing coolant reservoir for the exact spec your manufacturer calls for, then buy accordingly. When in doubt, a “universal” OAT coolant rated for your engine’s metal composition is the safer bet than guessing from color alone.
A ready-to-pour extended-life coolant that skips the dilution math — confirm it matches your manufacturer’s spec first.
Check Price on AmazonTools & Materials Checklist
None of this requires a lift or specialty tools. Here’s everything you’ll want within reach before you start:
- A drain pan with at least a 5-gallon capacity — cooling systems hold more fluid than people expect.
- A funnel, ideally a spill-free/no-spill funnel that locks onto the fill neck and makes it far easier to bleed air later.
- The correct new coolant for your vehicle, plus separate distilled water if you’re buying concentrate rather than a pre-mixed 50/50 blend.
- A radiator flush cleaner rated safe for your radiator’s metal — skip household substitutes; see the callout below.
- Nitrile gloves and eye protection for the whole job, not just the draining step.
- A wrench or screwdriver sized for your drain plug/petcock, plus old towels or rags for the inevitable drips.
- Sealable, labeled containers for the old coolant so it can go to a proper recycling drop-off rather than sitting open in the garage.
One more consideration that trips people up: not every drain valve is easy to reach with the car sitting flat on the ground. Low-clearance sedans and sports cars in particular sometimes need the front end raised on ramps just to get a pan and your hand underneath. If you go this route, use proper ramps or jack stands rated for your vehicle’s weight rather than balancing on a single jack — you’ll have both hands busy with a wrench and a pan, and that’s not the moment to discover your jack has shifted.
The two cheapest tools that make this whole job noticeably less messy.
Check Price on AmazonThe Step-by-Step Radiator Flush (Standard Method)
This is the process that works for the vast majority of cars with a traditional pressurized radiator cap and a bottom-mounted drain valve. Read through it once before you start — steps 5 and 6 involve the engine running, so it helps to know what’s coming.
Confirm the Engine Is Completely Cold
Park on level ground and don’t touch the radiator cap until the car has sat untouched for at least an hour — longer if you were just on the highway. Touch the top hose first; if it’s still warm, wait longer. A pressurized hot system is the single most dangerous part of this job, and it’s entirely avoidable with patience. If you’re not sure whether it’s cooled enough, an infrared thermometer aimed at the radiator core will confirm it in seconds — anything reading close to ambient temperature is safe to proceed.
Set Up Your Workspace
Make sure the car is on flat, level ground so drained fluid actually lands in your pan instead of running off to one side. Pop the hood and prop it securely. If the drain valve sits high enough to slide a pan underneath without jacking the car, you’re set; if not, use ramps rather than a single jack for stability while you’re working underneath. Lay down cardboard or an old towel beneath the pan too — even careful draining tends to splash more than you’d expect the first time you do this.
Remove the Radiator Cap
With a rag over your gloved hand, press down on the cap first — this releases residual pressure — then turn counterclockwise to remove it. If you feel any resistance or hissing, stop and let the system sit longer before continuing. Set the cap somewhere clean; you’ll need it again later. While it’s off, take a quick look at the rubber seal on its underside — a cracked or flattened seal won’t hold pressure properly once you refill, and it’s a cheap, easy part to replace while everything’s already open.
Open the Drain Valve and Empty the Old Coolant
Locate the drain valve (often called a petcock) at the bottom of the radiator, position your pan directly beneath it, then loosen it with a wrench or by hand, depending on the design. Let it drain completely — this usually takes 10–15 minutes — then close the valve firmly before moving to the next step. If the petcock is plastic and hasn’t been touched in years, turn it gently — these are notorious for snapping if forced, which turns a routine flush into an unplanned parts run.
Add Flush Cleaner and Run the Engine
Close the drain valve, then pour in your radiator flush cleaner along with distilled water, following the product’s dilution instructions. Replace the cap, start the engine, and turn the heater to its highest setting — this opens the thermostat and pulls the cleaning solution through the heater core too, not just the radiator. Let it run for the time specified on the bottle (typically 10–15 minutes), and only do this outdoors or in a well-ventilated space. Keep an eye on the temperature gauge while it idles; if it climbs toward the hot end faster than usual, that’s your cue to shut it down early rather than push through to the full time on the bottle.
Drain Again, Then Rinse With Plain Distilled Water
Shut the engine off, let it cool back down, and drain the cleaning solution the same way you drained the original coolant. You’ll likely see it come out darker and grittier than the first drain — that’s the sediment doing its job. Refill with plain distilled water, run the engine again briefly, and drain once more until the water runs essentially clear. Don’t worry about hitting perfectly crystal-clear water on an older, neglected system — a faint tint after two or three passes is normal, but you’re looking for a clear improvement pass over pass, not a single miracle rinse.
Refill With the Correct Coolant Mix
Close the drain valve for the last time and refill with your chosen coolant — either straight from a pre-mixed 50/50 jug, or concentrate mixed with distilled water at the ratio your manufacturer specifies (usually 50/50, sometimes different for extreme climates). Fill slowly to give trapped air a chance to escape as you go, right up to the fill line. If you’re switching coolant colors or brands from what was originally in the car, this is the moment that matters most — make sure the new fluid is actually compatible with whatever trace amount of the old formula might still be clinging to the system, or you’re back to the gelling risk covered earlier.
Bleed Trapped Air and Confirm the Fill
Leave the cap off (or loose, if your system has a separate pressurized reservoir), start the engine, and run the heater on max. Top off the coolant as the level drops — this is the air escaping and true liquid taking its place. Once the level holds steady with no more bubbles, seal everything up, take it for a short test drive, and recheck the level once it’s cooled back down. Give this test drive real attention — a few minutes of city driving followed by a short highway stretch will reveal a lingering air pocket or weak thermostat far faster than idling in the driveway ever would.
That’s the complete standard flush. For most passenger cars with a straightforward radiator cap and petcock, these eight steps — cold engine, staged workspace, cap off, drain, clean, rinse, refill, bleed — are the entire job.
Breaks up rust and sediment without attacking aluminum or rubber seals — the stand-in for vinegar or bleach.
Check Price on AmazonThe Reverse-Flush Method (When Sediment Won’t Quit)
If your coolant came out heavily contaminated, or the standard method above still leaves the rinse water cloudy after a couple of passes, a reverse flush pushes water through the system in the opposite direction from normal flow. This dislodges sediment that settles in corners the standard flush doesn’t reach as effectively, particularly in the engine block and heater core.
The tradeoff is complexity: a reverse flush typically involves a dedicated flush kit, disconnecting the heater hose at the engine, and directing water in through the lower radiator connection so it exits where coolant would normally enter. It’s a legitimate step up in thoroughness, but it’s also easy to get wrong on a first attempt, and doing it incorrectly on a system with a fragile heater core is a real risk.
In practice, most reverse-flush kits use a T-fitting spliced into the heater hose, with a garden-hose attachment on the third leg. Water enters through that fitting and is forced backward through the heater core and engine block before exiting through the radiator’s normal inlet, which is the reverse of how coolant travels during regular driving. That reversed direction is what dislodges debris that’s settled against surfaces the normal flow direction tends to leave undisturbed. It’s effective, but it’s also a job better suited to a second attempt at cooling-system DIY than a first one.
Worth it when…
- Coolant came out extremely rusty or sludge-like
- You’re prepping an older car for a coolant-type switch
- Standard rinses still aren’t running clear after two passes
Skip it if…
- This is your first time doing any cooling-system DIY
- Your coolant came out only mildly discolored
- Your heater core is already older or suspect
For most routine maintenance flushes, the standard method is genuinely sufficient. Reach for a reverse flush as a targeted fix, not a default first step — and if you’re unsure, a shop can do it in the time it’d take you to source the kit.
Bleeding Air Pockets After You Refill
Step 8 above covers the basics, but air pockets are the number one reason a freshly flushed car comes back with an overheating problem, so it’s worth a closer look. Every time you open the cooling system, air gets in. Left trapped, it collects in the highest points of the system — often the thermostat housing or heater core — where it blocks coolant flow and creates a hot spot even though your reservoir looks perfectly full.
Watch for these signs that air is still trapped after a refill:
- Gurgling or bubbling sounds from the dash or engine bay after the car has been running.
- A heater that runs cold even on the max setting, since air in the heater core blocks hot coolant from reaching it.
- The temperature gauge spikes unpredictably, then settles, then spikes again — a classic air-pocket pattern rather than a steady climb.
A few things make this step easier: a spill-free funnel raises the fill point above the radiator neck, which gives air a straighter shot upward and out. Some vehicles — particularly certain European models — have a dedicated bleed screw on the thermostat housing or a high hose; crack it slightly while filling until you get a steady stream with no bubbles, then close it. Gently squeezing the upper radiator hose by hand can also help nudge stubborn pockets loose while the engine idles.
If the temperature gauge is still unstable after a proper bleed, that’s usually a sign of something mechanical rather than a leftover air pocket — a failing thermostat, a weak radiator cap seal, or a developing coolant leak worth tracking down before it turns into a bigger repair.
DIY vs. Professional Flush: Cost and Time
The financial case for doing this yourself is one of the more clear-cut ones in DIY car care, mostly because the labor markup on a fairly simple fluid service is significant.
| DIY | Professional Shop | |
|---|---|---|
| Typical cost | ~$20–$60 in coolant, cleaner, and water | Roughly $100–$200, depending on shop and coolant type |
| Time required | 1–2 hours, plus cooldown waiting time | 30–60 minutes of shop time |
| Tools needed | Basic hand tools, pan, funnel | None — shop supplies everything |
| Best for | Comfortable working under the hood, want to confirm coolant type/quality | Tight on time, no safe place to work, or car has a known cooling-system issue |
Both figures vary a fair amount by region, vehicle size, and coolant type — extended-life OAT coolant costs more per gallon than basic green IAT, and larger cooling systems simply need more of it. If your car takes a specialty coolant or has a history of cooling-system trouble, factor a little extra into either column.
Disposing of Old Coolant the Right Way
Used coolant isn’t ordinary garage waste, and treating it like household trash isn’t just environmentally careless — it’s illegal in most places. Ethylene glycol, the base ingredient in most conventional coolant, is toxic to humans and devastating to pets and wildlife, and it carries a sweet taste that makes accidental poisoning a genuine risk if it’s left sitting in an open container or puddle.
- Never pour it down a drain, into a storm sewer, or onto the ground. Federal and most state regulations treat this as illegal disposal of hazardous waste, and it can contaminate groundwater far beyond your own property.
- Capture it in a clean, sealed, clearly labeled container the moment it comes out of the radiator — don’t leave it open, even briefly, if there’s any chance a pet could get near it.
- Take it to a recycling point. Many auto parts stores accept used coolant for free, as do most repair shops and municipal household hazardous waste facilities. A quick call ahead confirms whether your local option takes it.
- Keep it separate from other fluids. Mixing old coolant with used motor oil or other automotive fluids complicates recycling and can turn a free drop-off into a paid hazardous-waste fee.
If you’re unsure where to take it locally, your city or county’s public works or environmental services page will usually list hazardous waste drop-off sites or seasonal collection events.
This isn’t just a suggestion with no teeth behind it. In the United States, the Environmental Protection Agency regulates hazardous waste disposal under the Resource Conservation and Recovery Act, and many states layer their own rules on top of that federal baseline. Used coolant that’s picked up contaminants from your engine — trace metals, oils, old additive residue — can meet the criteria for regulated hazardous waste, and dumping it improperly can carry real fines on top of the environmental damage. None of that should scare you away from doing your own flush; it just means the last step deserves the same care as the rest of the job.
Keeps old coolant contained and clearly marked until you can get it to a proper drop-off.
Check Price on AmazonCommon Mistakes That Ruin a DIY Flush
- Using tap water instead of distilled. Minerals in tap water build scale inside the radiator and engine block over time, which is exactly what you just spent an afternoon removing.
- Mixing coolant types. Topping off an OAT system with leftover green IAT (or vice versa) can gel the additives together and clog narrow passages. If you’re not certain what’s already in the system, flush it out completely first.
- Skipping the bleed step. A trapped air pocket after refilling is one of the most common reasons a “successful” flush is followed by a mysterious overheating problem a few days later.
- Opening the cap on a warm system. This is the one mistake that can actually hurt you. If there’s any doubt, wait longer.
- Assuming a flush fixes a leak. If the reason your coolant was low in the first place is a leak, a flush and refill just buys you time until the level drops again — and if a prior additive was masking a small leak, flushing it out can make that leak reappear.
- Using vinegar or bleach as a “natural” cleaner. Covered above, but worth repeating — both accelerate corrosion rather than prevent it.
- Not accounting for the transmission cooler. On many vehicles, the transmission fluid cooler is built into the radiator itself. If a flush knocks loose debris that doesn’t fully clear the system, it can end up affecting transmission cooling too. It’s rare, but it’s part of why a thorough rinse — not just a quick drain-and-refill — matters.
If you’ve checked all of these and the car is still running hot after a proper flush and bleed, that points toward something mechanical — a failing thermostat, a weak water pump, or a more serious issue like a head gasket problem that a flush alone was never going to solve.
How Often You Should Actually Do This
The honest answer is “check your owner’s manual first,” because the interval depends heavily on which coolant type your manufacturer specifies:
- IAT (green) coolant: roughly every 2 years or 24,000–30,000 miles — its silicate and phosphate additives deplete relatively quickly.
- OAT coolant (many GM, VW, Honda, Chrysler models): up to 5 years or 150,000 miles under normal conditions.
- HOAT / P-HOAT coolant: typically 5 years or 100,000–150,000 miles, depending on the specific formula and manufacturer.
Those are starting points, not guarantees. Heavy towing, frequent short trips in extreme heat, or a car that’s simply gotten older than five years regardless of mileage are all reasons to check sooner rather than waiting for the interval to hit exactly. A cheap set of coolant test strips can tell you the additive concentration in about thirty seconds, which is a faster answer than guessing from color alone.
It’s also worth flushing a little ahead of schedule if you’re heading into a season of extremes right after a long stretch of neglect — going into a harsh winter or a brutal summer on coolant that’s already marginal gives it less margin to work with exactly when it’s under the most strain. And if you’ve just bought a used car with no service history, treat the cooling system the same way you’d treat unknown timing belt or brake history: assume it’s due, check it early, and use that first flush as your new baseline going forward.
A quick way to check additive strength and freeze protection between full flushes.
Check Price on AmazonRolling this into a broader maintenance habit pays off — the same mindset that keeps you on top of coolant also tends to catch things like early serpentine belt wear or a failing alternator before either leaves you stranded.
Frequently Asked Questions
It depends on your coolant type. Older green IAT coolant is typically good for about 2 years or 24,000–30,000 miles, while modern OAT and HOAT formulas can often run 5 years or up to 150,000 miles. Always check your owner’s manual for the exact interval your manufacturer recommends.
You can, and it’s fine for routine maintenance if the old coolant still looks reasonably clean. But a straight drain-and-refill leaves behind sediment and scale clinging to the radiator and engine passages, which a proper flush with a cleaning stage removes.
No. Tap water carries minerals that build up as scale inside the cooling system over time, which undoes much of the benefit of flushing in the first place. Distilled water has had those minerals removed, so stick with it for both the rinse stage and any coolant dilution.
Color alone doesn’t tell you whether two coolants are chemically compatible. Mixing incompatible additive packages, like IAT and OAT, can cause the coolant to gel and clog narrow passages in the radiator and heater core. If you’re not sure what’s currently in your system, do a complete flush before adding anything new.
Budget 1–2 hours of active work, plus at least an hour of cooldown time before you start if the car has been recently driven. Most of the active time is spent waiting for fluid to drain or for the engine to idle during the cleaning and bleeding stages.
No, not for the standard method described in this guide. Running the engine with the heater on high is enough to open the thermostat naturally and circulate the cleaning solution through the full system, including the heater core.
Heavy sediment buildup sometimes needs more than one cleaning pass to fully clear, especially in older cars or ones that have gone a long time between services. Repeat the rinse cycle, or consider a reverse flush if the standard method isn’t getting the water to run clear after a couple of attempts.
The main risk is opening the system while it’s still warm or pressurized, which can cause hot coolant to spray out. As long as you wait for the engine and radiator to cool completely and wear gloves and eye protection, this is a low-risk job for most home mechanics.
Capture it in a sealed, labeled container right away and take it to a recycling drop-off — many auto parts stores, repair shops, and municipal hazardous waste facilities accept it for free. Never pour it down a drain or onto the ground; it’s toxic to pets, wildlife, and groundwater.
Yes. Any time you open the cooling system, air gets introduced, and that air needs to be purged before the car goes back into regular driving. Skipping this step is one of the most common reasons a flush is followed by an unexplained overheating issue.
A Clean Cooling System Is Cheap Insurance
Flushing a radiator isn’t a glamorous job, but it’s one of the few pieces of car maintenance where an afternoon of your own time buys real protection against one of the most expensive failure modes an engine can have. Cold engine, staged workspace, drain, clean, rinse, refill, bleed — that’s the whole process, and none of it requires anything you can’t pick up at a parts store.
Get the coolant type right, don’t rush the cooldown or the bleed step, and dispose of the old fluid responsibly, and you’ve covered the parts that actually matter. The engine that’s protected by a properly maintained cooling system is the same engine that avoids the far more expensive repairs — warped heads, blown gaskets, seized water pumps — that show up when overheating is left unchecked for too long. Treat this as a recurring line item in your maintenance routine, not a one-time fix, and it’ll keep paying that afternoon of effort back for years.
Shop Coolant & Flush Supplies on Amazon🚗 Recommended for Drivers
Drive Safer Every Day
Explore our top picks for car safety gear — from dashcams to emergency kits — all hand-picked to help you stay safe on the road.
🚗 Shop Car Safety EssentialsAffiliate link — we earn a small commission that keeps DriveSafeGuide running. Thank you!