Trailer Hitch Classes Explained: A Comprehensive Guide to Safe Towing
Every hitch class carries a number stamped on it for a reason. Here’s what Class 1 through Class 5 actually mean, how to read the rating plate, and how to pick a setup that won’t let you down on the highway.
Somewhere in a shop in Ohio, a stamping press pushes a number into a piece of steel, and that number becomes the single most important fact about the hitch it’s attached to. It isn’t a marketing figure. It’s a legal, engineered limit — the amount of weight that piece of metal is rated to pull and to carry at the tongue before something starts to bend, crack, or let go entirely. Most drivers never look at it. They see a receiver tube welded to their bumper, assume “a hitch is a hitch,” and hook up a trailer that outweighs what the hardware was ever built to handle.
That gap between assumption and rating is where a lot of towing accidents start. A hitch class isn’t a suggestion — it’s the ceiling. This guide walks through what each class (1 through 5) is actually rated for, how the industry standard behind those numbers works, and how to translate your vehicle’s tow rating and your trailer’s loaded weight into a setup you can trust at 70 mph in a crosswind. If you’re also building out a broader car safety kit for road trips, the hitch is the piece of equipment where “close enough” causes the most damage.
Part of the confusion comes from how hitches are marketed versus how they’re engineered. A retailer listing might advertise a hitch as “heavy duty” without specifying which class it actually falls under, or list a maximum weight capacity without separating GTW from tongue weight. Reading the actual stamped rating plate — not just the product title — is the only way to know for certain what you’re buying. This guide exists to make that stamped number make sense the moment you read it, whether you’re shopping for a first utility trailer or upgrading a truck that’s about to start hauling a camper every summer.
01 Why the Class Number Isn’t Just a Number
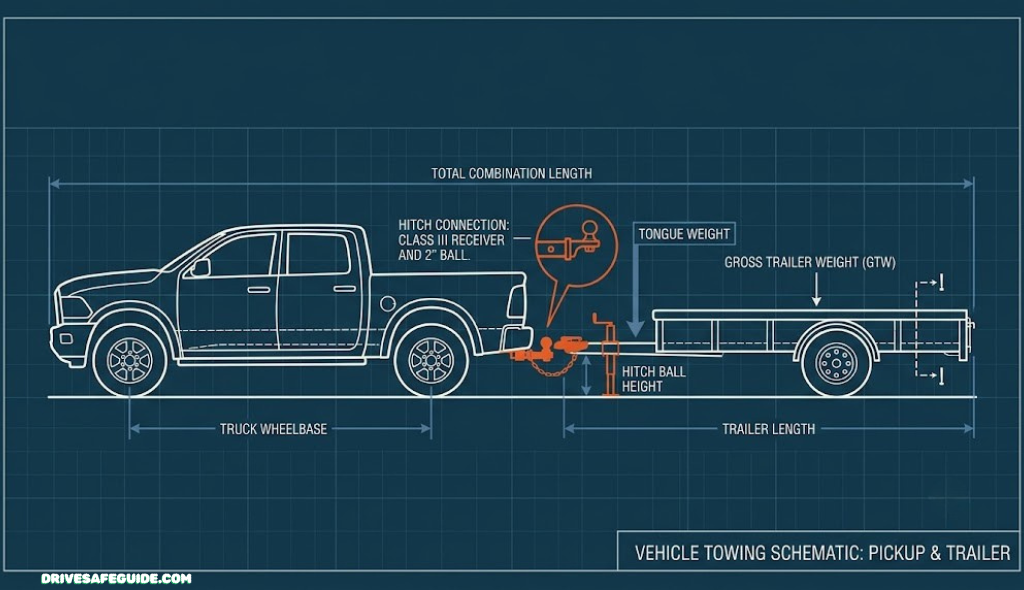
Every trailer hitch sold in North America is built to the Society of Automotive Engineers’ J684 standard, which sets minimum strength requirements for each weight class. The class number on the hitch — usually stamped or laser-etched on the receiver tube or a metal tag welded near it — tells you two figures at once: Gross Trailer Weight (GTW), the maximum total weight of a loaded trailer the hitch can tow, and Tongue Weight (TW), the maximum downward force the hitch can carry at the coupling point, typically 10–15% of GTW.
Exceeding either number doesn’t announce itself immediately. A receiver rated for 3,500 lbs GTW can physically accept a 6,000 lb trailer and drive away from the driveway without incident. The failure shows up later — in a sway event on the highway, in a cracked weld after a few thousand miles of overloading, or in a hitch pin shearing under a hard brake. This is also why hitch class works hand in hand with good driving habits generally; the margin a properly rated hitch buys you matters most in the exact moments covered in our guide to defensive driving habits that reduce collision risk, like sudden lane changes or emergency stops with a loaded trailer behind you.
02 How the Classification System Works
The five hitch classes scale roughly by receiver tube size and mounting hardware, which is why a Class 1 hitch physically cannot accept the same ball mount as a Class 4. As the rated capacity climbs, the receiver opening grows, the mounting bolts get larger, and the frame attachment points multiply.
| Class | Receiver Opening | Typical GTW | Typical Tongue Weight |
|---|---|---|---|
| Class 1 | 1-1/4″ | up to 2,000 lbs | up to 200 lbs |
| Class 2 | 1-1/4″ | up to 3,500 lbs | up to 350 lbs |
| Class 3 | 2″ | up to 8,000 lbs | up to 800 lbs |
| Class 4 | 2″ | up to 10,000 lbs | up to 1,000 lbs |
| Class 5 | 2″ or 2-1/2″ | up to 20,000 lbs | up to 2,000 lbs |
These figures are ceilings for the hitch hardware itself — they assume the tow vehicle, ball mount, and hitch ball are also rated for the same load, and that the load is a properly rated as the weakest link in the entire chain. A 10,000 lb-rated Class 4 receiver paired with a 3,500 lb ball mount is still only good for 3,500 lbs. Every component in the chain gets rated separately, and the lowest number in that chain is the number that actually applies.
03 Class 1 Hitches
Class 1 is the entry point, built for sedans, coupes, and small crossovers that were never designed with towing as a priority. The receiver opening is 1-1/4 inches, and the rated capacity tops out around 2,000 lbs GTW with roughly 200 lbs of tongue weight.
Best for: small utility trailers, single-jet-ski trailers, folding camping trailers, and bike racks. Common on compact sedans, small crossovers, and some minivans.
Not built for: anything with brakes of its own, boats over roughly 14 feet, or enclosed cargo trailers loaded with tools and equipment. The frame attachment points on Class 1 hitches are lighter-gauge, and the vehicles they’re bolted to usually have modest frame structure to begin with.
Because Class 1 vehicles often have limited factory tow ratings to start with, it’s worth cross-checking your owner’s manual tow rating against the hitch’s rating — the lower of the two wins. This is also the class where weight-distribution hardware essentially never applies; the trailers pairing with Class 1 hitches are light enough that distributing tongue weight across axles isn’t necessary.
One detail owners of lighter vehicles often miss: a car’s unibody construction handles tongue weight differently than a truck’s body-on-frame design. Even within the Class 1 rating, loading close to the maximum tongue weight on a small sedan can noticeably affect handling and rear suspension geometry in a way that the same tongue weight wouldn’t on a heavier vehicle. If you’re regularly hauling near the top of a Class 1 rating, it’s worth watching for rear squat and considering whether a Class 2 upgrade — paired with a vehicle actually rated for it — makes more sense long term.
04 Class 2 Hitches
Class 2 keeps the same 1-1/4 inch receiver opening as Class 1 but uses heavier-gauge steel and stronger frame brackets to push the rating up to roughly 3,500 lbs GTW and 350 lbs tongue weight.
Best for: small pop-up campers, single-axle utility trailers loaded with equipment, small boats, and larger cargo trailers used occasionally rather than daily.
Common vehicles: midsize sedans with a factory tow package, larger crossovers, and some minivans. Because the receiver opening is identical to Class 1, it’s easy to physically mount a Class 1 accessory to a Class 2 hitch — but doing so still caps you at the lower-rated component.
This is roughly where trailer brakes start becoming relevant in many states — check your local threshold, since requirements vary. If you’re loading a Class 2 setup near its ceiling regularly, it’s worth reading up on why vehicles shake at highway speed, since an overloaded tongue is one of the more common causes of a shimmy that owners initially blame on tire balance.
A lot of buyers land in Class 2 by default simply because it’s a common factory option, without checking whether it actually covers their trailer once loaded. It’s worth resisting the urge to treat “what came with the vehicle” as automatically sufficient — a factory Class 2 hitch on a minivan is a reasonable match for a small pop-up camper, but the same hitch strained against a fully loaded utility trailer full of landscaping equipment is a mismatch that the hardware won’t announce until something gives.
05 Class 3 Hitches
Class 3 is where the receiver opening jumps to 2 inches and the rated capacity climbs meaningfully — up to about 8,000 lbs GTW and 800 lbs tongue weight. This is the class most full-size trucks and SUVs ship with from the factory, and it’s the most common aftermarket upgrade for owners who outgrow a Class 2 setup.
Best for: mid-size travel trailers, larger boats, car haulers, and enclosed toy haulers loaded with equipment.
Weight-distribution territory: Class 3 is typically the point where a weight-distributing hitch with sway control starts being recommended rather than optional, especially as you approach the upper end of the rating. We cover that setup in detail further down.
Where Class 3 Shines
- Wide compatibility with truck and SUV frames
- 2″ receiver opens up the largest accessory market (bike racks, cargo carriers, ball mounts)
- Enough headroom for weight-distribution add-ons
Where It Falls Short
- Still undersized for large travel trailers or dual-axle boats over 20 feet
- Tongue weight capacity can be the limiting factor before GTW is
06 Class 4 Hitches
Class 4 keeps the 2-inch receiver but reinforces the mounting hardware and frame brackets further, pushing capacity to roughly 10,000 lbs GTW and 1,000 lbs tongue weight. These are typically standard equipment on heavy-duty pickups (think 3/4-ton and up) and are the class most often chosen by owners hauling fifth-wheel-adjacent loads without going to a true fifth-wheel setup.
Best for: large travel trailers, dual-axle boats, car haulers with a loaded vehicle on board, and equipment trailers used for construction or landscaping work.
Vehicle pairing matters more here: a Class 4 hitch bolted to a half-ton truck doesn’t override the truck’s own factory tow rating. Manufacturers set that number based on frame strength, cooling capacity, and braking, not just the hitch. Always defer to whichever number is lower.
At this weight range, tire condition and brake performance stop being background concerns and start being active safety factors. It’s worth reviewing how to tell brake fade from hydraulic failure before a long tow, since braking a loaded trailer down a mountain grade puts real heat into a system that’s already working harder than usual.
07 Class 5 Hitches
Class 5 is the ceiling for standard receiver-style hitches, split into two sub-tiers: Class 5 Xtra Duty (XD) typically rated to around 12,000–14,000 lbs GTW, and Class 5 Commercial Duty (CD), which can be rated up to 20,000 lbs GTW depending on the manufacturer. Some Class 5 hitches use a 2-inch receiver reinforced further; others step up to a 2-1/2 inch opening to accept heavier-duty ball mounts.
Best for: large livestock trailers, heavy equipment trailers, big toy haulers, and commercial-duty applications on Class 3-and-up pickups or medium-duty trucks.
Reality check: very few passenger vehicles or half-ton trucks are actually rated by their manufacturer to use the full capacity of a Class 5 hitch. The hitch being rated for 20,000 lbs doesn’t mean your truck’s frame, engine cooling, or brakes are. This class exists primarily for heavy-duty and commercial platforms.
Buyers occasionally reach for a Class 5 hitch simply because “more capacity can’t hurt,” but oversizing the hitch relative to the tow vehicle can create its own problems. A heavier-duty receiver typically weighs more itself, adds unsprung weight at the rear of the vehicle, and — on a vehicle not actually rated for Class 5 loads — offers a false sense of security that overshadows the vehicle’s own, lower, real limit. The right approach is sizing the hitch to genuinely match both the trailer and the vehicle, not simply buying the largest number available.
08 Side-by-Side Comparison
Here’s the full lineup in one place, useful for a quick gut-check before you buy.
| Class | Receiver | Max GTW | Max TW | Typical Use |
|---|---|---|---|---|
| Class 1 | 1-1/4″ | 2,000 lb | 200 lb | Bike racks, small utility trailers |
| Class 2 | 1-1/4″ | 3,500 lb | 350 lb | Pop-up campers, small boats |
| Class 3 | 2″ | 8,000 lb | 800 lb | Mid-size travel trailers, larger boats |
| Class 4 | 2″ | 10,000 lb | 1,000 lb | Large trailers, car haulers, equipment |
| Class 5 | 2″ / 2-1/2″ | up to 20,000 lb | up to 2,000 lb | Heavy equipment, livestock, commercial |
Multi-fit Class 3 Receiver Hitch, 2″ Opening
A solid step-up choice for owners moving from Class 2 into mid-size trailer territory.
Check Price on Amazon09 Weight-Distribution Setups: When a Ball Mount Isn’t Enough
A standard hitch and ball mount pins all of the trailer’s tongue weight onto the tow vehicle’s rear axle. Past a certain point, that concentrated weight lifts pressure off the front axle, which softens steering response and shortens headlight reach — exactly the wrong combination at night on an unfamiliar road. A weight-distributing hitch (WDH) solves this with spring bars that transfer some of that tongue weight forward, back onto the front axle and onto the trailer’s own axles, leveling the whole rig out.
Signs You Need One
- Tongue weight exceeds roughly 500 lbs, or manufacturer guidance recommends it
- The rear of the tow vehicle visibly squats when hitched
- Headlights aim noticeably higher than normal once loaded
- You’ve experienced trailer sway at highway speed
Trade-offs
- Heavier and more involved to hook up than a standard ball mount
- Spring bars need to be matched to your specific tongue weight range
- Not compatible with every trailer frame (some require add-on brackets)
Most WDH kits also include integrated sway control, which uses friction or hydraulic damping to resist the side-to-side oscillation that develops when a gust of wind or a passing semi disturbs a trailer at speed. If you’re planning a long haul with a loaded trailer, pairing a correctly sized WDH with the habits in our pre-road-trip safety check guide covers both the hardware and the pre-drive routine.
Weight-Distributing Hitch with Integrated Sway Control
Levels your rig and cuts down on highway sway when towing near your tongue weight limit.
Check Price on Amazon10 Gooseneck & Fifth-Wheel: Beyond the Standard Classes
Once loads climb into truly heavy territory — large horse trailers, big fifth-wheel campers, flatbed equipment trailers — the industry moves away from rear-bumper receiver hitches entirely. Fifth-wheel hitches mount in the truck bed over the rear axle and use a jaw-and-kingpin connection similar to a semi-truck, which distributes weight far more directly into the frame. Gooseneck hitches use a ball mounted in the bed connecting to a matching coupler on the trailer, popular for livestock and flatbed trailers because of their tight turning radius.
Both styles can handle GTW ratings well beyond even a Class 5 receiver hitch — often 20,000 to 30,000+ lbs — because the connection point sits closer to the truck’s center of gravity rather than hanging off the back bumper. If your towing needs are creeping toward this territory, it’s a different category of equipment entirely, not just a bigger version of a Class 5 setup, and it typically requires a dedicated truck bed installation.
The trade-off with both styles is bed space. A fifth-wheel hitch’s kingpin box takes up a meaningful footprint in the truck bed, and a gooseneck ball, while smaller, still needs to be considered against anything else you regularly haul back there. Some owners split the difference with a removable or folding gooseneck ball that stows flush with the bed floor when not towing, preserving cargo space the rest of the time. If you’re deciding between a heavy-duty Class 5 receiver setup and stepping up to gooseneck or fifth-wheel, the deciding factor usually isn’t just weight — it’s whether the truck bed itself can accommodate the hardware alongside whatever else it’s used for day to day.
11 Matching a Hitch Class to Your Vehicle and Trailer
The math here is straightforward once you have the right numbers in front of you, but it requires pulling from two separate sources rather than guessing.
Step 1: Find your vehicle’s real tow rating
This comes from the manufacturer, not the hitch. Check the owner’s manual or the driver’s door jamb sticker, and note that tow ratings often vary by trim, engine, and axle ratio on the same model year. A crew-cab truck with a smaller engine may be rated meaningfully lower than the same truck with a tow package.
Step 2: Find your trailer’s fully loaded weight
Not the empty weight on the trailer’s manufacturer sticker — the actual weight once it’s loaded with gear, water, fuel, and cargo. A weigh station or a certified truck scale gives you a real number instead of an estimate. This is the figure that has to fit under both your vehicle’s tow rating and your hitch’s GTW rating.
Step 3: Choose the hitch class that covers both
Pick the class where your loaded trailer weight sits comfortably under the rated GTW — not right at the ceiling. A common approach is leaving 10–15% of headroom under the rating for margin, since loaded weight tends to creep up over a trip as you add gear.
If your travel plans involve long stretches or unfamiliar routes with a loaded trailer, it’s worth cross-referencing our cross-country driving checklist and scenic byway route planning guide — towing changes braking distance, passing time, and grade performance, all of which affect route choices, not just hitch selection.
It helps to think of the whole rig as one connected weight budget rather than two separate numbers. Tongue weight from the trailer subtracts directly from your tow vehicle’s remaining payload capacity — a truck with a 1,500 lb payload rating that’s carrying 400 lbs of passengers and gear plus 600 lbs of tongue weight only has 500 lbs of margin left, regardless of how much room remains under the trailer’s own GTW rating. Overlooking this is one of the more common ways an otherwise correctly classed hitch setup still ends up overloaded in practice. A quick check on a certified scale, with the vehicle loaded exactly as it will be for the trip, removes the guesswork entirely.
12 Receiver Sizes, Ball Sizes & Pin Diameters
Hitch class and receiver opening size correlate, but they’re not interchangeable concepts — and ball size is a separate rating entirely from either one.
| Ball Diameter | Typical Max Capacity | Common Pairing |
|---|---|---|
| 1-7/8″ | 2,000–3,500 lb | Class 1–2 hitches |
| 2″ | 3,500–8,000 lb | Class 2–4 hitches |
| 2-5/16″ | 6,000–20,000 lb | Class 3–5 hitches |
| 3″ | up to 30,000 lb | Heavy-duty gooseneck adapters |
The ball itself is stamped with its own rated capacity, shank diameter, and rise/drop measurement — all of which need to be checked separately from the receiver class. A 2-5/16″ ball rated for 6,000 lbs bolted onto a Class 4 ball mount doesn’t inherit the mount’s 10,000 lb rating; the ball is still the limiting factor at 6,000 lbs. The hitch pin and clip matter too — a worn or mismatched pin is a small, cheap part that’s disproportionately responsible for connection failures when it isn’t fully seated or is left unclipped.
Rise and drop also matter more than most first-time buyers expect. A ball mount that sits too high leaves the trailer nose-down, shifting weight toward the trailer’s rear axle and reducing steering feel on the tow vehicle. Too low, and the trailer rides nose-up, which can reduce headlight visibility for vehicles behind you and unload the trailer’s front axle. The goal is a trailer that tows level, measured from the trailer frame itself, not just eyeballed from the driver’s seat. Adjustable ball mounts, which allow the rise or drop to be changed by flipping or repositioning the mount, make this easy to dial in across different trailers or loading conditions without buying a separate mount for each.
13 Installation: DIY vs Professional
Most Class 1–3 hitches are designed for bolt-on installation using existing frame mounting points, which makes them realistic weekend DIY projects for anyone comfortable under a vehicle with a torque wrench. Class 4 and 5 hitches, and anything involving drilling into the frame or running new wiring circuits, tend to benefit from a shop’s lift and experience — particularly when factory wiring harnesses need to be tapped into correctly rather than spliced.
DIY Makes Sense When
- The hitch is a direct bolt-on kit for your exact make/model/year
- No drilling or frame modification is required
- You have a torque wrench and can access published torque specs
Go Professional When
- The install requires drilling or frame modification
- You’re also adding a brake controller or new wiring circuit
- The class is 4 or 5 and errors carry higher consequences
Whichever route you take, torque specs on the mounting bolts aren’t optional guidance — under-torqued bolts loosen under vibration, and over-torqued bolts can strip threads or stress the frame. A basic backup camera installation alongside your hitch install isn’t a bad idea either, since a rear camera makes it dramatically easier to line up a hitch ball with a trailer coupler solo.
After any install — DIY or professional — plan on a short re-torque check after the first fifty to one hundred miles of towing. New hardware tends to seat slightly under initial load, and bolts that were properly torqued at installation can read a few foot-pounds low after that first real-world stress test. It’s a five-minute check that catches the one scenario — a loosening bolt going unnoticed for months — that turns a correctly rated hitch into an unreliable one.
14 Safety Chains, Wiring & Legal Requirements
Beyond the hitch itself, a legal and safe tow setup has a few non-negotiable components that get overlooked more often than the hitch rating does.
Safety chains
Cross the chains under the coupler in an X pattern before attaching them to the tow vehicle. If the coupler fails, the crossed chains catch the trailer tongue and keep it from dropping straight onto the roadway. Chains should be rated for at least the trailer’s GTW, with enough slack to allow turning but not so much that they drag.
Wiring
Most light-duty trailers use a 4-pin flat connector for basic running lights, brake lights, and turn signals. Trailers with electric brakes typically need a 7-pin round connector, which adds circuits for brake controllers, a backup power feed, and a breakaway switch.
Breakaway systems
Required in most states above a certain GTW threshold (commonly 3,000 lbs, though this varies), a breakaway switch triggers the trailer’s own brakes automatically if it separates from the tow vehicle — a critical backup when a hitch or coupler fails mid-drive.
State-by-state variation
Trailer brake requirements, maximum towing speed, and required safety equipment differ by state. It’s worth a quick check of your state DMV’s towing regulations before a long trip, especially if your route crosses state lines.
7-Pin to 4-Pin Trailer Wiring Adapter Kit
Keeps running lights, brakes, and turn signals synced between mismatched connectors.
Check Price on Amazon15 Common Mistakes & Hazards
Most towing incidents don’t trace back to one dramatic failure — they trace back to a handful of small, avoidable shortcuts stacking up until the margin runs out. Here are the ones worth paying deliberate attention to before every tow.
- Matching the hitch class to the trailer’s empty weight, not its loaded weight. Gear, water tanks, and cargo add up fast.
- Ignoring tongue weight while focused only on GTW. A trailer can sit under its GTW limit while still overloading the tongue weight rating.
- Skipping the weight-distribution hitch at higher tongue weights. This is the leading contributor to trailer sway incidents on the highway.
- Reusing an old hitch pin or clip that’s worn or bent. These are inexpensive parts that carry outsized consequences when they fail.
- Not checking tire condition on both vehicle and trailer before a tow. Related reading: diagnosing highway-speed shaking and tire balance issues.
- Overlooking blind spots created by a wide trailer. Blind-spot mirrors for trucks and SUVs help close that visibility gap.
- Forgetting that braking distance increases substantially with a loaded trailer, which changes safe following distance in ways many drivers underestimate until they need to stop suddenly.
- Assuming the trailer’s axle rating covers the whole trailer’s capacity. Axle ratings, tire ratings, and hitch ratings are all separate numbers — the lowest one is the trailer’s real limit, not just the biggest number printed on the VIN sticker.
None of these are exotic failure modes. They’re ordinary oversights that a five-minute pre-tow walk-around catches almost every time, which is exactly why that walk-around belongs in the routine rather than something reserved for long trips only.
16 Maintenance & Inspection Checklist
A hitch is a piece of load-bearing hardware exposed to road salt, moisture, and constant vibration — it deserves a quick inspection before every tow, not just an annual glance.
| Check | What to Look For |
|---|---|
| Receiver tube | Rust, corrosion, or cracking at the weld points |
| Mounting bolts | Loose torque, missing hardware, stripped threads |
| Hitch ball | Wear grooves, correct size stamped, secure to shank |
| Pin & clip | Bent, rusted, or not fully seated |
| Wiring connector | Corroded pins, cracked housing, loose ground wire |
| Safety chains | Frayed links, worn hooks, correct crossed routing |
Keeping a properly inflated spare and a reliable inflator in the vehicle matters more with a trailer attached, since a flat becomes harder to manage safely on the shoulder with a loaded trailer behind you. Our tire inflator buying guide breaks down duty cycle and CFM ratings if you’re shopping for one geared toward towing use.
Grease matters more than most owners realize, too. A light coat of grease on the hitch ball reduces friction and wear at the coupling point, especially on setups that see frequent hook-ups and unhooks. Skipping this over months of use accelerates wear grooves on the ball, which can eventually affect how snugly the coupler seats — a small maintenance habit with an outsized effect on long-term reliability.
Stainless Steel Hitch Receiver Lock
Blocks unauthorized use of your receiver when the vehicle is parked or unattended.
Check Price on Amazon17 Brake Controllers Explained
Once a trailer is heavy enough to need its own brakes — electric brakes are the most common setup on travel trailers and larger utility trailers — the tow vehicle needs a brake controller mounted inside the cabin to manage them. Skipping this step, or running a mismatched controller, means the trailer’s brakes either don’t engage at all or engage unpredictably, which is its own hazard in an emergency stop.
Time-delayed controllers
These apply the trailer’s brakes at a preset, fixed intensity whenever the tow vehicle’s brake pedal is pressed, with a short delay built in. They’re simpler and less expensive but don’t adjust to how hard you’re actually braking — a light tap and a panic stop trigger a similar level of trailer braking force.
Proportional controllers
These use an internal accelerometer to sense how hard the tow vehicle is decelerating and apply trailer braking force proportionally. A gentle stop gets gentle trailer braking; a hard stop gets hard trailer braking, applied almost simultaneously with the tow vehicle’s own brakes. Most experienced towers consider this the safer standard, particularly for anything in Class 3 territory and up, since it reduces the jarring, unbalanced feel of a trailer that brakes disproportionately to the vehicle pulling it.
18 Towing in Tough Conditions
A trailer changes how a vehicle behaves in weather that would otherwise be a non-event. The added surface area catches crosswinds harder, the added weight extends stopping distance, and the added length changes how much room you need to merge or pass. A few conditions are worth planning around specifically.
High wind and passing trucks
A gust hitting the broad side of a trailer, or the turbulence off a passing semi, is one of the more common triggers for sway. Reviewing our guide on driving in high winds without losing control is worth doing specifically with a loaded trailer in mind — the correction technique (easing off the throttle, avoiding a sharp steering correction) applies just as much when towing, arguably more.
Rain and reduced visibility
Wet pavement extends braking distance further with a loaded trailer than it does with the tow vehicle alone, since the total mass being decelerated is higher. Our rain driving safety guide covers cruise control risks at speed, which apply with extra force when towing — cruise control and wet roads with a trailer attached is a combination worth avoiding.
Fog and low visibility
A trailer’s added length means a following driver has less warning before encountering the full length of your rig in low visibility. Reviewing fog driving visibility strategies before a foggy-morning tow is a small habit that pays off in exactly the situation you’d least want to be caught off guard in.
Mountain grades
Long downhill grades put sustained heat into brakes on both the tow vehicle and trailer. Descending in a lower gear to use engine braking, rather than riding the brakes continuously, reduces the risk of brake fade — a topic covered in more depth in our guide on recognizing brake fade versus hydraulic failure.
19 Buying Guide: What to Check Before You Order
- Confirm fitment by year, make, model, and trim — not just “fits most trucks.” Frame mounting points vary more than people expect.
- Match the class to your realistic loaded trailer weight, with margin, not the trailer’s minimum empty weight.
- Check the finish. Powder-coated and e-coated hitches resist road salt corrosion far better than bare steel, especially in winter climates.
- Buy the ball mount and ball separately if needed — many hitches ship without either, and both carry their own independent rating.
- Factor in wiring. If your vehicle doesn’t already have a 7-pin harness, budget for that separately from the hitch itself.
- Read the returns policy before you buy. Fitment issues are common enough with aftermarket hitches that a straightforward return path matters, especially when ordering online without seeing the part in person first.
If you’re outfitting a vehicle for regular trailer use, it’s worth reviewing our broader road trip essentials checklist and, if you’re combining towing with camping, our car camping conversion tips and notes on rooftop cargo carrier safety, since roof load and trailer load both affect the same overall vehicle payload budget. Traveling with a dog in tow? Our guide to pet restraint crash test ratings is worth a look before a long haul.
Adjustable Drop Ball Mount, 2″ Shank
Adjustable rise/drop keeps your trailer level regardless of tow vehicle ride height.
Check Price on AmazonThe Class Number Is the Whole Point
A hitch class isn’t a bureaucratic detail — it’s the single figure that tells you whether your setup can handle what you’re about to ask of it. Get the vehicle’s real tow rating, get your trailer’s actual loaded weight, and choose a hitch class that covers both with room to spare. Everything else — the ball, the wiring, the safety chains, the weight-distribution bars — is built to support that one number, not replace it.
Before your next trip, run through our road trip safety check guide with the trailer hooked up, not just the tow vehicle alone.
FAQ Frequently Asked Questions
What’s the difference between a Class 3 and Class 4 hitch?
Both use a 2-inch receiver opening, but Class 4 uses heavier-gauge steel and stronger mounting hardware, raising the rating from roughly 8,000 lbs GTW to 10,000 lbs GTW.
Can I put a Class 3 ball mount into a Class 4 receiver?
Physically, yes, since both use a 2-inch receiver opening. But the overall setup is only rated for the lowest-rated component in the chain — so it would be limited to the Class 3 ball mount’s capacity, not the receiver’s higher rating.
How do I know my trailer’s actual tongue weight?
A tongue weight scale (either a dedicated hitch scale or a bathroom scale with a pipe fulcrum setup) gives an accurate reading. As a rough estimate, tongue weight typically runs 10–15% of the trailer’s total loaded weight.
Do I need a weight-distributing hitch for a small camper?
If the tongue weight stays comfortably under roughly 500 lbs and the tow vehicle handles it without squatting or headlight glare issues, a standard ball mount is usually sufficient. Above that, a WDH is generally recommended.
Is a higher hitch class always better?
Not necessarily. A heavier-rated hitch is fine to install, but your tow vehicle’s own manufacturer-rated tow capacity is still the limiting factor. Installing a Class 5 hitch on a vehicle rated for 5,000 lbs doesn’t raise the vehicle’s rating.
What size ball do I need for my trailer?
Check the coupler on your trailer — it’s typically stamped with the required ball diameter (commonly 1-7/8″, 2″, or 2-5/16″). Using the wrong size ball can allow the coupler to separate even when properly latched.
Are weight-distribution hitches legal to skip if my state doesn’t require them?
Weight-distribution hitches are generally a manufacturer recommendation tied to tongue weight rather than a state legal mandate, though some states do reference them in towing regulations. Trailer brakes and breakaway systems, by contrast, are often legally required above certain weight thresholds.
How often should I inspect my hitch?
A quick visual and physical check before every tow (bolts, pin, ball, wiring, chains) plus a more thorough inspection each season, especially after winter driving with road salt exposure.
Can I install a hitch myself?
For many Class 1–3 bolt-on hitches designed for your specific vehicle, yes, with a torque wrench and basic tools. Class 4–5 installs, or anything requiring drilling or new wiring circuits, often benefit from professional installation.
What’s the difference between a receiver hitch and a gooseneck hitch?
A receiver hitch mounts behind the rear bumper and covers Classes 1 through 5. A gooseneck hitch mounts in the truck bed over the rear axle and is used for much heavier loads, typically for livestock or flatbed equipment trailers, where a receiver-style setup wouldn’t be rated high enough.
🌟 Recommended for Comfort
Drive More Comfortably Every Day
From lumbar supports to seat cushions, the right accessories can transform long drives from painful to comfortable. Browse our top picks on Amazon.
📯 Shop Comfort AccessoriesAffiliate link — we earn a small commission that keeps DriveSafeGuide running. Thank you!