A Step-by-Step DIY Cabin Air Filter Replacement Guide
Musty AC, weak airflow, and a whistling dashboard vent almost always trace back to one overlooked part. Here’s exactly how to find it, remove it, and swap it in — no shop visit required.
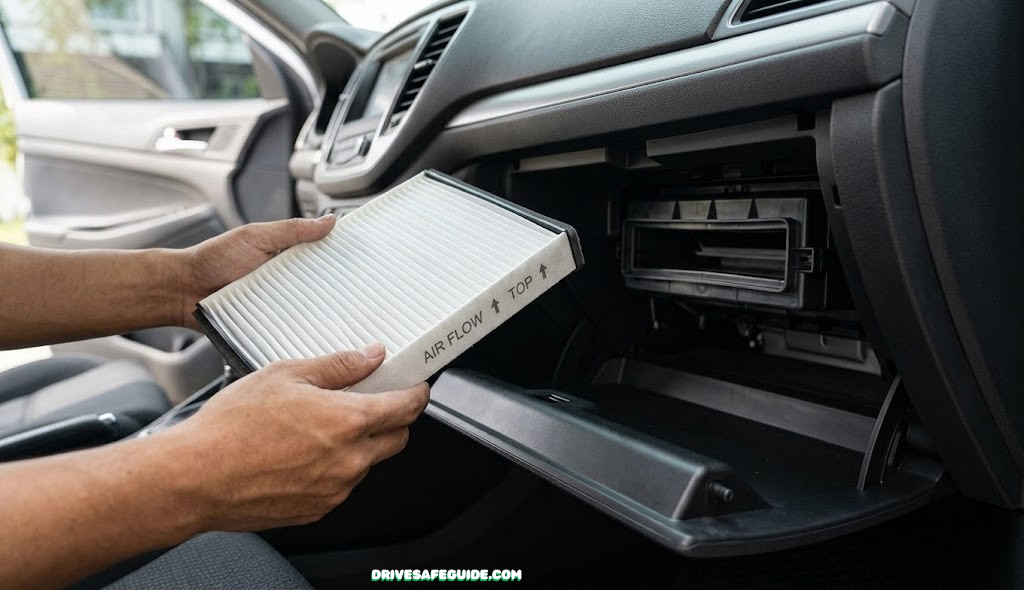
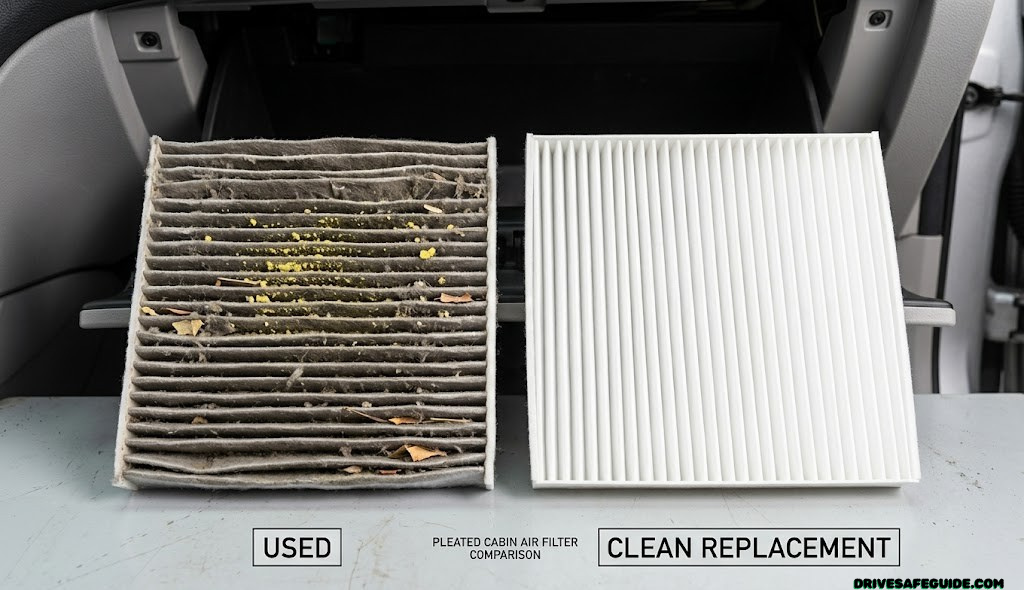
The difference between a filter that’s earned retirement and one still doing its job is visible in about two seconds.
Why Your Cabin Air Filter Matters More Than You Think
Most drivers can tell you when their oil is due or when a tire looks low, but ask about the cabin air filter and you’ll usually get a shrug. It’s tucked out of sight, it never triggers a dashboard light, and it doesn’t affect whether the engine starts. That combination of invisibility and silence is exactly why it gets ignored longer than almost anything else on the car — and why, when it finally fails, the symptoms feel disproportionately unpleasant for such a small part.
The cabin air filter sits between the outside world and the air blowing through your vents. Every time the blower motor runs — whether you’ve got the AC cranked in July or the heat on in a cold snap — the air is pulled through this filter first. Pollen, brake dust, diesel soot, mold spores, and roadway particulate all get trapped in its pleated media before that air reaches your face. A filter that’s saturated with months of debris doesn’t stop working cleanly; it starts pushing that trapped material back into the cabin, restricts airflow so your defroster and AC take longer to do their job, and creates a damp, organic environment where odor-causing bacteria multiply.
There’s also a knock-on effect for the blower motor itself. A clogged filter forces the fan to work harder to push the same volume of air, which shortens motor life and can eventually mean a much more expensive repair than a $12 part. If you’ve ever dealt with symptoms that felt more like an electrical issue — like the kind of intermittent dash weirdness described in our guide to solid vs. flashing check engine lights — it’s worth ruling out something this simple before assuming the worst.
It’s worth pausing on just how much air actually passes through this one small part. A typical HVAC blower can move several hundred cubic feet of air per minute on its higher settings, and every bit of that volume is drawn through the filter media before it reaches the cabin. Multiply that by the hours most people spend commuting, running errands, or sitting in traffic with the recirculate button off, and you start to see why a filter rated for a year of “typical” driving can be pushed well past its limit by a single bad allergy season or an unusually dusty commute. The part is small, but its workload is not.
There’s also a comfort dimension that’s easy to underestimate until it’s gone. Passengers with asthma, young children, or anyone prone to motion sickness tend to notice cabin air quality far more acutely than the driver does, since they’re not distracted by the road. A stale, dusty cabin can turn a routine commute into a mildly miserable experience for a passenger, and it’s the kind of thing that gets blamed on “just how old cars smell” long after the actual, fixable cause has been sitting behind the glovebox the entire time.
The good news is that this is one of the most beginner-friendly repairs on the entire vehicle. On the vast majority of cars built in the last two decades, it requires no tools, no jacking the car up, and no risk of damaging anything expensive if you make a small mistake. It’s a genuinely satisfying five-minute win, and once you’ve done it once, you’ll never pay a shop’s parts-plus-labor markup for it again.
What Your Cabin Air Filter Is Actually Trapping
It helps to understand what’s actually accumulating in there before you pull it out for the first time, mostly so the sight of it doesn’t catch you off guard. The pleated media is designed to catch particulate across a wide range of sizes, and over months of driving, several distinct categories of debris build up in layers.
Pollen and plant matter is often the most visually obvious — a fine yellow-green dust that coats the pleats during spring and early summer in most temperate climates. Road dust and mineral particulate kicked up from the pavement and surrounding traffic makes up a huge share of the bulk in normal driving, and it’s noticeably heavier in rural or unpaved-road environments. Brake dust, a fine black-grey powder generated by every vehicle on the road including your own, tends to concentrate near the edges of the filter frame. Diesel soot and combustion particulate shows up more in filters from vehicles that spend a lot of time behind trucks or in dense urban traffic. And in older or long-neglected filters, you may also see mold or mildew growth, especially in humid climates, which is the most likely source of that lingering musty smell even after a filter swap if the growth has spread beyond the filter itself.
None of this is dangerous to observe or handle — a pair of gloves is a nice-to-have, not a necessity — but it does explain why a filter that looks merely “a little grey” from across the garage can look dramatically different up close, and why replacing it on a predictable schedule matters more than waiting for a visible tipping point.
Signs Your Cabin Air Filter Needs Replacing
None of these symptoms are dramatic on their own, which is exactly why they’re easy to dismiss for months. Taken together, though, they build a pretty clear picture.
- A musty or “wet gym sock” smell when the AC or heat first kicks on, especially after the car has sat for a while.
- Noticeably weaker airflow from the vents even with the fan on its highest setting.
- A rattling or whistling noise from behind the dashboard, which can mean the filter media has partially collapsed or torn.
- Fogging that’s slow to clear on the windshield, since restricted airflow makes the defroster less effective.
- Visible dust settling faster than usual on the dashboard or center console.
- Increased sneezing or allergy flare-ups specifically while driving, which points to pollen or mold being recirculated rather than filtered.
- The AC seems to be “working harder” for less cooling, since restricted airflow means less total conditioned air actually reaches the cabin even if the compressor and refrigerant are perfectly healthy.
- Passengers comment on the smell before you notice it yourself, which is common since drivers acclimate to a gradual smell change over weeks, while an occasional passenger notices it immediately.
If several of these sound familiar, you’re almost certainly overdue. The fix takes less time than reading the rest of this article, and unlike a lot of car problems, there’s no diagnostic ambiguity here — you either replace it, or you don’t, and the difference is immediately obvious the first time the blower kicks on afterward.
It’s also worth noting that these symptoms tend to appear gradually rather than all at once, which is precisely what makes this part so easy to neglect. A filter doesn’t fail the way a headlight bulb does, with an unmistakable before-and-after moment. Instead, airflow tapers off by a few percent a week, and odor creeps in slowly enough that most drivers simply adjust their expectations rather than recognizing a fixable problem. If it’s been more than a year, or you genuinely can’t remember the last time you checked, that alone is reason enough to take five minutes and look.
Tools & Materials You’ll Need
This is one of the shortest tool lists you’ll find for any car repair. Most vehicles need nothing beyond your hands and the new filter itself; a small number of models require a screwdriver or a trim tool to release a housing clip.
| Item | Needed For | Typically Required? |
|---|---|---|
| New cabin air filter (correct size for your make/model) | The actual replacement | Always |
| Owner’s manual or a quick VIN lookup | Confirming filter part number | Recommended |
| Flathead or Phillips screwdriver | Housing covers with screws instead of tabs | Sometimes |
| Nitrile gloves | Keeping debris and dust off your hands | Optional but nice |
| Small vacuum or microfiber cloth | Cleaning the empty housing before the new filter goes in | Optional |
| Flashlight or phone light | Seeing into the glovebox cavity or under-dash housing | Helpful in low light |
Because this job asks so little of your toolbox, it’s a good candidate to knock out at the same time as other quick wins — refreshing your car safety kit or checking items off your road trip essentials checklist before a longer drive.
One detail worth double-checking before you start: not every filter sold under a given size label fits identically, since some manufacturers use slightly different pleat depth or frame thickness even within the “same” nominal dimension. If your vehicle has ever had aftermarket HVAC work done, or if you’re buying a filter secondhand or from an unfamiliar brand, it’s worth test-fitting before you fully commit — slide it partway into the housing and confirm it seats without excessive resistance before pushing it all the way home. This takes an extra thirty seconds and prevents the mildly annoying scenario of driving back to the parts store because a filter that was technically “the right size” on paper turned out to be a few millimeters off in practice.

Skip the guesswork on part numbers
Most cabin air filters are model-specific. A quick fitment check before you order saves a return trip.
Check Cabin Air Filter Fitment on AmazonFinding Your Cabin Air Filter’s Location
This is genuinely the part people get stuck on most — not because the job is hard, but because manufacturers hide this filter in a handful of different spots depending on the platform. Once you know which of the three common layouts your car uses, the rest is simple.
| Location Type | Where to Look | How Common | Difficulty |
|---|---|---|---|
| Behind the glovebox | Directly behind the glovebox bin, accessed by dropping or removing the box | Most common by far | Easy |
| Under the hood, at the cowl | Passenger-side base of the windshield, under a plastic cowl panel | Common on some European and truck platforms | Moderate |
| Under the dashboard | Low on the passenger footwell, sometimes behind a kick panel | Less common, mostly older or specific models | Moderate |
| Center console base | Beneath the front console, rare layout | Rare | Harder |
If you’re not sure which category your vehicle falls into, your owner’s manual will specify it directly, and most manuals include a diagram. A quick search of your exact year, make, and model plus “cabin air filter location” will also turn up a match within seconds — it’s one of the most searched maintenance questions there is, so documentation is thorough. For the rest of this guide, we’ll walk through the glovebox method step by step, since it covers the majority of vehicles on the road, and flag where the process diverges for cowl or under-dash setups.
Step-by-Step Replacement Guide Glovebox Method
Set aside about fifteen minutes, though most people finish in less than ten once they’ve done it once. Work slowly on your first pass — the goal is to understand how the housing comes apart, not to rush it.
Step 1 — Clear the Glovebox and Locate the Stops
Empty the glovebox completely, including anything wedged into side pockets or elastic straps — you’ll need the box to swing freely without cargo shifting around inside it. Most gloveboxes are held partially open by two plastic stops or arms on either side that catch against the frame when the door swings down. These are usually visible as small tabs or dampener arms near the top corners of the box opening once it’s hanging open at its normal resting angle. You’ll need to release both of them to let the box drop further than its normal resting position, which is what actually exposes the cavity behind it.
Take a moment here to note how your specific glovebox stops are designed, since they vary by manufacturer. Some are simple friction tabs you squeeze inward with a finger and thumb; others are small plastic arms that unclip from a rounded stud. Neither type requires real force — if something feels like it’s about to snap, stop and look more closely rather than pushing through resistance.
Squeeze or unclip each stop arm — they’re usually plastic tabs, not screws.
Step 2 — Fully Release and Drop the Glovebox Door
With both stops released, the glovebox door should hinge down much further than its normal open position, sometimes swinging almost flat. On some vehicles it detaches entirely and lifts out; on others it just hangs low enough to expose the cavity behind it. Either way, this reveals the filter housing cover sitting just above and behind where the box used to sit.
The filter housing cover sits directly above the glovebox cavity, usually a plastic panel with a small latch or two screws.
Step 3 — Open the Filter Housing Cover
The housing cover is a separate small panel from the glovebox door itself. Depending on your vehicle, it releases with a simple push-tab, a quarter-turn latch, or one or two Phillips screws. Look for a labeled arrow or a small embossed icon on the cover — many manufacturers mold a filter symbol directly into the plastic.
Note whether yours uses a latch (push and slide) or screws — you’ll reverse the same motion on reinstall.
Step 4 — Slide Out the Old Filter
With the cover open, you’ll see the filter sitting in a slotted tray, usually with a cardboard or plastic frame around the pleated media. Slide it out along its tracks — it typically comes out at a slight angle rather than straight down. Take a photo of it in place before removing it fully; this gives you an exact reference for airflow direction and orientation when installing the new one.
This is also the moment where you’ll get a clear sense of how overdue the swap actually was. Hold the old filter up to a window or a flashlight and look for even light passing through the pleats — patchy, dark, or completely blocked sections confirm the airflow restriction you may have been noticing. If the frame feels damp, or you notice any organic debris that doesn’t look like ordinary road dust, take an extra minute to inspect the empty housing carefully before moving on, since that can indicate a leak point elsewhere in the HVAC intake worth mentioning to a mechanic on your next visit.
Trapped debris often falls loose here — have a cloth or vacuum nozzle handy.
Step 5 — Check the Airflow Direction Arrows
Nearly every cabin air filter has small printed arrows on its frame indicating airflow direction, and these must point the same way as the old filter did. Installing it backward doesn’t damage anything, but it significantly reduces filtering efficiency and can increase noise. If the old filter’s arrows are worn off or unreadable, rely on the photo you took in Step 4, or note which side faced the blower motor versus the cabin.
Arrows on the frame should always point toward the blower motor, matching the original orientation.
Step 6 — Clean the Empty Housing
Before the new filter goes in, take thirty seconds to clear out any loose leaves, dust, or debris sitting in the empty tray. A dry microfiber cloth or a vacuum with a narrow nozzle attachment works well. Skipping this step just means the new filter starts its life pre-loaded with the same material it’s supposed to be catching.
A cleaner tray means the new filter isn’t contaminated on day one.
Step 7 — Insert the New Filter and Close Everything Up
Slide the new filter in along the same tracks, matching the airflow arrow orientation you confirmed in Step 5. It should seat flush without needing force — if it feels like it’s binding, double-check it isn’t upside down or backward, since the frame is usually not symmetrical. Once seated, close the housing cover (reversing whatever latch or screw method it used), then lift the glovebox door back up and snap both side stops back into place.
Give the cover a gentle push test once it’s closed — it should feel solidly seated with no give, not loosely resting in place. A cover that isn’t fully clicked or screwed down is the single most common cause of a new whistling noise after this repair, so it’s worth the extra five seconds of confirmation before moving on to reassembling the glovebox itself.
Listen for the same click or screw resistance you felt when you opened it — that’s your confirmation it’s seated correctly.
Step 8 — Test the Blower on Every Speed
Start the car and run the blower fan through its full range, low to high, on both fresh air and recirculate settings. Airflow should feel noticeably stronger than before, and there shouldn’t be any new rattling, whistling, or resistance. If you hear a new noise, it usually means the housing cover isn’t fully seated rather than anything wrong with the filter itself — pop it open and reseat it.
Stronger, quieter airflow on every speed setting confirms a clean install.
A quick note on cowl and under-dash layouts: the core logic is identical — release a cover, note orientation, swap the filter, reverse the steps — but you’ll be working under the hood at the base of the windshield, or low in the footwell behind a kick panel, instead of through the glovebox. Those covers more often use screws than clips, so keep a screwdriver within reach.

Stubborn clips or screws?
A basic trim tool set makes housing covers and kick panels far easier to pop open without cracking plastic tabs.
See Trim Tool Kits on AmazonChoosing the Right Replacement Filter
Once you know how to do the swap, the only real decision left is which filter to buy. There are three broad tiers, and the right one depends on your climate, allergies, and how much you’re willing to spend for a bit more filtration. It’s tempting to default to whatever’s cheapest at the parts counter, and for a lot of drivers that’s genuinely a fine choice — but if you’ve been dealing with persistent odor, seasonal allergy flare-ups, or heavy commute traffic, it’s worth understanding what the step up actually buys you before deciding it isn’t worth the extra few dollars.
Standard Pleated Paper Filter
- Lowest cost option
- Captures dust, pollen, and larger particulate effectively
- Widely available for nearly every vehicle
- Good baseline choice if you replace on schedule
Standard Pleated Paper Filter — Limits
- Does little for odors or fine soot
- Less effective against smoke particulate
- Shorter effective lifespan in dusty regions
Activated Carbon Filter
- Adds an odor- and gas-absorbing carbon layer
- Noticeably reduces exhaust and diesel smell in traffic
- Better performance during wildfire smoke season
- Still captures particulate like a standard filter
Activated Carbon Filter — Limits
- Costs roughly 40–70% more than standard filters
- Carbon layer saturates and loses odor-absorption over time even if particulate filtering still works
High-Efficiency / HEPA-Style Filter
- Finest particulate capture of the three tiers
- Best choice for severe allergy sufferers
- Often layered with carbon for odor control too
High-Efficiency Filter — Limits
- Highest price point
- Denser media can slightly restrict airflow on older, weaker blower motors
- Not available for every vehicle platform
If you’re unsure where to start, a mid-range activated carbon filter covers the widest range of use cases — it’s the option most drivers end up settling on after trying a basic paper filter and noticing the odor difference.

Ready to upgrade your filter tier?
Activated carbon filters are a direct swap — same install steps, better odor and smoke control.
Browse Activated Carbon FiltersVehicle-Specific Quirks Worth Knowing
While the glovebox method covers most sedans, crossovers, and compact SUVs, a handful of design differences are common enough to mention before you start.
- Vehicles with a damped, slow-closing glovebox often use a small hydraulic or friction cylinder in addition to the usual stop arms. Don’t force the box past its resting point quickly — let the damper do its job, and locate the separate release tabs rather than trying to overpower the mechanism.
- Larger trucks and full-size SUVs sometimes place the filter housing lower and further back than expected, occasionally requiring the passenger seat to be pushed fully back for comfortable access.
- Some European models favor the under-hood cowl location even on compact cars, which means the entire glovebox-removal process described above doesn’t apply — instead, you’re working with a panel at the base of the windshield, secured with a row of small clips or screws.
- Vehicles with a rear passenger climate zone occasionally have a second, smaller filter for the rear system, often located under a rear seat cushion or in a side panel — check your owner’s manual specifically if your vehicle has independent front and rear climate controls.
- Hybrid and electric vehicles sometimes route a portion of cabin air through a filter that also protects sensitive electronics or battery cooling intakes, which can mean a slightly different filter specification than the equivalent gas-only trim. Always confirm by VIN rather than assuming cross-compatibility with a non-hybrid version of the same model.
If your particular vehicle doesn’t match the glovebox pattern at all, the core sequence of ideas — release a cover, note orientation, swap the media, reverse the steps — still applies. Only the physical access point changes.
Common Mistakes to Avoid
- Installing the filter backward. Ignoring the airflow arrows is the single most common error, and it quietly cuts filtration efficiency without any obvious symptom.
- Forcing a filter that doesn’t fit. A filter that requires real force to seat is almost always the wrong size or orientation — check the part number again rather than pushing harder.
- Skipping the housing cleanout. Leaving debris in the tray contaminates the new filter immediately.
- Not fully re-securing the glovebox stops. A glovebox that swings loosely or won’t latch usually means one of the two side stops didn’t snap back into place.
- Buying by “universal fit” claims alone. Cabin air filters vary in dimension even across trims of the same model year — always confirm with your exact VIN or part number.
- Assuming a clean-looking filter means it’s fine. Odor and bacterial growth can develop before the filter looks visibly dirty, especially in humid climates.
How Often Should You Replace It?
There’s no single universal number, since it depends heavily on where and how you drive. The table below gives a realistic starting point that you can adjust based on your own conditions.
| Driving Environment | Suggested Interval | Notes |
|---|---|---|
| Typical suburban/mixed driving | Every 12,000–15,000 miles or annually | Standard manufacturer baseline |
| Heavy urban traffic / stop-and-go commuting | Every 8,000–10,000 miles | More exhaust and brake dust exposure |
| Dusty, rural, or unpaved-road regions | Every 6,000–8,000 miles | Filter saturates faster |
| High pollen season / severe allergies | Check every 3–4 months | Consider carbon or HEPA-style filter |
| Frequent wildfire smoke exposure | Inspect after any heavy smoke event | See our guide on driving through wildfire smoke |
When in doubt, a quick visual check every oil change is a good habit — pull it out, hold it up to a light source, and if you can’t see light passing through the pleats evenly, it’s time for a new one.
Troubleshooting After Replacement
The install is simple enough that problems are rare, but a few things are worth knowing in case something feels off afterward.
Airflow still feels weak
Double-check the housing cover clicked fully shut — a partially open cover can create an air leak that bypasses the filter and paradoxically makes airflow feel uneven. If the cover is secure and airflow is still weak, the blower motor resistor or the motor itself may be the actual issue, which is a separate diagnostic path worth exploring with an OBD2 scan tool if your vehicle logs HVAC-related codes.
A new rattling or whistling noise
This almost always traces back to a housing cover that isn’t fully seated, or a filter installed at a slight angle instead of flush. Reopen, reseat, and close again.
Musty smell persists even with a new filter
If odor doesn’t improve, the source may be mold growth on the evaporator core itself rather than the filter. An AC evaporator cleaner treatment or a professional AC system service may be needed in that case — the filter swap alone won’t resolve odor that originates deeper in the HVAC system.
Glovebox won’t close properly
This usually means one of the two side stop arms didn’t fully re-engage. Open the box again, manually push each stop back into its slot, and test the close motion before loading anything back into it.
Airflow smells fine, but only on certain fan speeds
If odor or noise only shows up on the highest blower setting, it’s worth checking whether the filter itself is a slightly denser tier — like a HEPA-style filter — that your particular blower motor wasn’t quite sized for. This isn’t a defect so much as a mismatch, and dropping back to a standard or activated carbon filter usually resolves it if a higher-tier filter is the cause.
You can’t tell if the filter you bought is genuinely the right size
If a filter seats but leaves a visible gap along one edge, or if it seems undersized compared to the tray, don’t force a caulk-and-hope installation. An improperly sized filter creates a bypass gap that lets unfiltered air around the media entirely, which defeats the purpose more thoroughly than simply running an old filter would. Return it and confirm the part number against your VIN rather than the general size printed on generic packaging.

Airflow issues beyond the filter?
A basic OBD2 scanner can help rule out blower motor or resistor codes in minutes.
View OBD2 Scanners on AmazonDIY vs. Shop Cost Comparison
| DIY Replacement | Dealer / Shop Service | |
|---|---|---|
| Parts cost | $10–$35 depending on filter tier | $15–$45 (often marked up) |
| Labor cost | $0 (10–20 minutes of your time) | $25–$60 labor charge |
| Total typical cost | $10–$35 | $40–$100+ |
| Time investment | 10–20 minutes | Drop-off + wait or scheduled appointment |
| Skill required | None to minimal | None (but you’re paying for convenience) |
Given how little specialized skill this job requires, it’s one of the clearest cases where a shop visit is paying almost entirely for convenience rather than expertise. That said, if you’re already having other maintenance done — like a serpentine belt inspection or checking for a coolant leak — it costs nothing to ask them to swap the filter at the same time.
Over the ownership life of an average vehicle, the gap adds up meaningfully. A driver who replaces this filter once a year for ten years pays somewhere in the range of $100–$350 doing it themselves, compared to potentially $400–$1,000 or more if every single swap goes through a shop’s service counter. It’s rarely framed this way because each individual visit feels small, but stacked over a decade, it’s one of the more painless ways to keep meaningful money in your pocket without cutting any corners on maintenance quality.
Seasonal & Climate Considerations
Your ideal replacement schedule should flex with the seasons and your local environment, not just mileage.
- Spring pollen season: Tree and grass pollen can saturate a filter within weeks in high-pollen regions. If you or passengers have seasonal allergies, check the filter at the start of the season rather than waiting for the usual interval.
- Wildfire smoke exposure: Heavy smoke events can clog even a fresh filter within days. Consider carrying a spare if you live somewhere with regular fire season, and review our tips on driving through wildfire smoke for cabin air strategies beyond just the filter.
- Dust storms and arid climates: Fine desert dust bypasses filtration faster than typical roadway grit. If you drive through dust storm-prone areas, see our dust storm driving protocol and shorten your filter interval accordingly.
- Extreme heat: Hot climates increase AC usage and blower runtime, which shortens the practical life of any filter. Pair this with the broader guidance in our extreme heat engine care guide.
- Winter humidity and road salt: Damp, salty air can accelerate odor-causing bacterial growth on a saturated filter, even in cold climates where you might not expect it.
None of this means you need to track a complicated seasonal calendar. The simplest approach is to treat the standard mileage or annual interval as a floor, not a fixed rule, and to give the filter a quick visual check whenever your local conditions shift noticeably — the first heavy pollen bloom of spring, the first smoke advisory of the season, or the first stretch of triple-digit heat. A thirty-second glance costs nothing, and it’s the difference between catching a saturated filter early and living with reduced airflow for months without realizing why.
Maintaining Long-Term Cabin Air Quality
Replacing the filter on schedule is the foundation, but a few complementary habits keep the air inside your car meaningfully cleaner between swaps.
- Run the AC on recirculate briefly after starting the car in a dusty parking area, then switch to fresh air once you’re moving, to avoid pulling in a concentrated burst of lot dust.
- Vacuum the interior regularly, since dust settled on seats and carpet gets stirred back into circulating air. A dedicated interior vacuum makes this far easier — see our roundup of the best car vacuum cleaners for deep interior cleaning, or the heavy-duty options for SUVs and trucks if you deal with more debris.
- Use a sunshade to reduce interior heat buildup, which slows the growth of odor-causing bacteria in warm, humid cabin air. Our guide to sunshade UV protection ratings covers what to look for.
- Address AC odor at the source if a filter swap alone doesn’t clear a musty smell — an evaporator cleaning treatment resolves what the filter can’t.
- Keep a spare filter in your glovebox toolkit if you live somewhere with heavy pollen or smoke seasons, so a mid-season swap doesn’t require a parts run.

Keep dust from working its way back in
Pairing a fresh filter with regular interior vacuuming makes the biggest difference in cabin air quality.
Shop Car Vacuums on AmazonFrequently Asked Questions
How do I know if my cabin air filter is bad?
The clearest signs are a musty smell when the AC or heater first turns on, noticeably weaker airflow at every fan speed, and windshield fogging that clears slowly. If you pull the filter and can’t see light through the pleats evenly, it’s overdue for replacement. Increased sneezing or allergy symptoms specifically while driving is another strong indicator, since it suggests pollen or mold spores are being recirculated rather than filtered out.
Where is the cabin air filter located?
On most vehicles it’s directly behind the glovebox, accessed by dropping the glovebox door down. Some vehicles instead place it under the hood near the windshield cowl, or low in the passenger footwell. Your owner’s manual will confirm which layout your vehicle uses.
How often should I replace the cabin air filter?
A common baseline is every 12,000–15,000 miles or once a year, but dusty regions, heavy traffic commutes, and high pollen or smoke seasons all call for more frequent checks — sometimes every 6,000–8,000 miles.
Can I clean and reuse a cabin air filter instead of replacing it?
Standard pleated paper filters aren’t designed to be cleaned and reused effectively — vacuuming loose debris off the surface can extend it slightly in an emergency, but it won’t restore full filtering capacity. Replacement is the reliable option.
What’s the difference between an engine air filter and a cabin air filter?
The engine air filter protects the engine’s intake system and lives in the engine bay near the throttle body. The cabin air filter protects the air you breathe inside the car and is a completely separate part, usually located behind the glovebox or under the cowl.
Do I need any tools to replace a cabin air filter?
On most vehicles, no tools are required at all — the housing uses simple push-tabs. Some models use screws to secure the housing cover, in which case a basic screwdriver is all you need.
Which way does the cabin air filter go in?
Look for small printed arrows on the filter’s frame — they should point in the direction air flows, toward the blower motor and cabin, matching the orientation of the old filter you removed.
How much does a cabin air filter replacement cost at a shop vs. DIY?
A shop typically charges $40–$100 or more once labor is included, while doing it yourself usually costs only the price of the filter itself, generally $10–$35 depending on the tier you choose.
Can a bad cabin air filter affect my AC or heater performance?
Yes. A clogged filter restricts airflow through the entire HVAC system, which can make the AC feel weaker and slow down defrosting and heating response times, even if the AC compressor itself is working fine.
What happens if I never replace my cabin air filter?
Over time it becomes fully saturated, restricts airflow significantly, strains the blower motor, and can start releasing trapped dust, pollen, and musty odors back into the cabin instead of filtering them out. In the most neglected cases, the added strain on the blower motor can shorten its lifespan, turning a small, inexpensive part into a considerably more expensive electrical repair down the line.
Are activated carbon cabin filters worth the extra cost?
For most drivers dealing with traffic exhaust smell, wildfire smoke, or general odor sensitivity, yes — the added carbon layer meaningfully reduces smells that a standard paper filter doesn’t address, for a modest price premium.
Can pests or rodents nest in the cabin air filter housing?
It happens more often than people expect, especially in vehicles parked outdoors for extended periods. Rodents are drawn to the soy-based coating used on some filter media. If you notice chewed material or debris that looks organic rather than dusty, inspect the housing and surrounding ductwork carefully.
A Five-Minute Habit With an Outsized Payoff
Of everything on a modern car’s maintenance list, this is about as close to a free win as it gets — a few minutes, a low-cost part, and a noticeable improvement every single time you turn on the vents. Once you’ve located your specific housing and done the swap once, you’ll never wonder about that musty smell or weak airflow again; you’ll just glance at the calendar and handle it.
What makes this repair worth prioritizing over other small maintenance tasks isn’t just the cost savings, though those add up quickly if you’re the kind of driver who replaces this every year for the life of a vehicle. It’s the immediacy of the feedback. Unlike a lot of preventive maintenance, where you’re trusting that an unseen part is quietly doing its job, this is one of the rare repairs where you’ll feel the difference the moment you turn the fan back on — stronger airflow, a cleaner smell, and one less thing quietly working against your comfort every time you get in the car.
If this guide helped, take a look at our broader road trip essentials checklist or car safety kit build guide next — small, proactive maintenance like this is exactly the kind of thing that keeps a road trip from being derailed by an avoidable problem. And if you found the housing more stubborn than expected on your particular vehicle, it’s still worth doing yourself once you know where everything sits; every subsequent replacement gets faster once the first one is behind you.
🚗 Recommended for Drivers
Drive Safer Every Day
Explore our top picks for car safety gear — from dashcams to emergency kits — all hand-picked to help you stay safe on the road.
🚗 Shop Car Safety EssentialsAffiliate link — we earn a small commission that keeps DriveSafeGuide running. Thank you!