Child Car Seat Guide:
Every Stage, Every Rule,
No Guesswork
From newborn infant seats to the final booster — the complete guide to choosing, installing, and fitting a car seat correctly at every stage of your child’s growth.
Car crashes are the leading cause of injury death for children ages 1 through 13 in the United States. The single most effective protection available is a correctly chosen and correctly installed car seat — yet studies consistently show that approximately 46% of car seats are misused in ways that significantly reduce protection.
This guide walks through every seat type, every stage, the rules that matter, and the mistakes that don’t look like mistakes until it’s too late. Whether you’re expecting your first child or transitioning your toddler to the next stage, the information here is grounded in NHTSA and AAP guidelines — presented plainly, without the jargon.
Why Getting This Right Is Non-Negotiable
A correctly installed car seat reduces the risk of fatal injury by 71% for infants and 54% for toddlers ages 1–4, compared to an unrestrained child. Those aren’t marginal improvements — they represent the difference between life and death in the crashes that happen every day on ordinary roads.
The challenge is that car seat safety involves a chain of correct decisions: choosing the right seat type for your child’s size, installing it properly in your vehicle, fitting the harness snugly on every single trip, and knowing when to move to the next stage. A single weak link in that chain undermines everything else.
Investing in the right seat — and using it correctly every time — is one of the highest-return safety decisions you’ll make as a parent. The rest of this guide gives you the knowledge to do it right. Pair it with the broader vehicle safety mindset covered in our safe driving habits guide and you’re building layered protection on every journey.
Federal Law: All 50 U.S. states and Washington D.C. have child restraint laws requiring children to be in an appropriate car seat or booster seat. Penalties, age requirements, and weight thresholds vary by state, but the minimum standard is that all children must be restrained. Always check your state’s specific requirements.
The Four Main Car Seat Types
Car seats fall into four broad categories, each designed for a specific stage of a child’s development. Advancing too early to the next stage removes protections the current stage was specifically engineered to provide.
Infant Seat
Birth – approx. 22–35 lbs
Rear-facing only. Removable shell with carry handle. Fits newborns and small infants best. Has a lower weight ceiling than convertible seats — most children outgrow them by 9–12 months.
Convertible Seat
Birth – approx. 65 lbs+
Rear-facing first, then converts to forward-facing. Stays in the vehicle. Handles larger infants and toddlers, often rear-facing up to 40–50 lbs. Best long-term value for a single seat.
Booster Seat
Approx. 40–120 lbs
Used after outgrowing the forward-facing harness. Positions the vehicle seat belt correctly across the child’s body. Available as high-back or backless models.
All-in-One Seat
Birth – 120+ lbs
Converts through all three stages: rear-facing, forward-facing with harness, and belt-positioning booster. Highest upfront cost but potentially the only seat you ever buy.
| Seat Type | Direction | Weight Range | Best For | Key Limitation |
|---|---|---|---|---|
| Infant-Only | Rear-facing | 4–35 lbs (varies) | Newborns, portability | Short usable lifespan |
| Convertible | Rear then forward | 5–65 lbs+ | Long-term rear-facing | Stays in car — less portable |
| Combination | Forward + booster | 22–120 lbs | Toddlers through school age | No rear-facing use |
| All-in-One | All directions | 5–120+ lbs | Single lifetime purchase | Large size, higher price |
| High-Back Booster | Forward (belt only) | 40–120 lbs | Side-impact protection | No harness — older children only |
| Backless Booster | Forward (belt only) | 40–100 lbs | Compact, easy travel | No side-impact protection |

Rear-facing to 50 lbs with 4-position extension panel. Forward-facing to 65 lbs. One of the most popular and trusted convertible seats available.
🛒 Check Price on Amazon*As an Amazon Associate we earn from qualifying purchases.
Rear-Facing Seats: The Most Protective Position
Rear-facing is not just for newborns — it is the safest possible position for any child who still fits within their seat’s rear-facing limits. The physics are straightforward: in a frontal crash (the most common and severe type), a rear-facing seat cradles and moves with the child, distributing crash forces across the entire back, head, and neck. A forward-facing child’s head is thrown forward, placing enormous stress on the neck and spine.
Frontal crash physics: rear-facing distributes force across the entire back; forward-facing concentrates stress on the child’s neck and spine
How Long Should a Child Stay Rear-Facing?
The American Academy of Pediatrics (AAP) recommends keeping children rear-facing until they reach the maximum height or weight limit of their rear-facing seat — not until a specific age milestone. Many convertible seats now support rear-facing up to 40–50 lbs, which means healthy, average-sized children can often remain rear-facing until age 3 or even 4.
The common parent question — “isn’t my toddler’s legs are too long to stay rear-facing?” — has a clear answer: leg comfort is not a safety concern. A child’s legs can touch or even press against the seatback. The danger is in the head and neck being unrestrained, not in the legs being compressed. Leg injuries in rear-facing seats are exceedingly rare and far less serious than the spinal injuries prevented by staying rear-facing longer.
Never rotate rear-facing early: Switching to forward-facing before a child meets the height/weight limit of their rear-facing seat removes the most critical crash protection available. The discomfort of legs touching a seatback is not a safety issue. A child’s neck snapping forward in a crash is.
Rear-Facing Angle
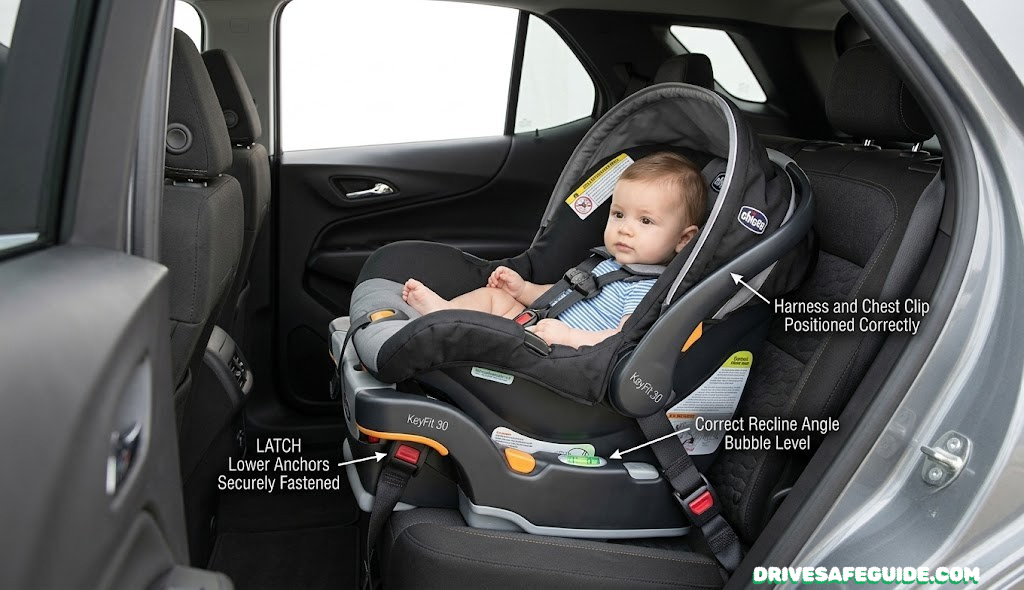
Rear-facing seats must recline at the correct angle (typically 30–45°) so a newborn’s airway stays open and the head doesn’t flop forward. Most seats have a built-in recline indicator (a bubble level or line mark) on the side of the seat. Always confirm the seat is within the correct angle range during installation.

Consistently top-rated infant seat. Easy click-in installation, 5-position recline, no-rethread harness, compatible with most strollers. Excellent for first-time parents.
🛒 Check Price on Amazon*As an Amazon Associate we earn from qualifying purchases.
Forward-Facing Seats: When and How to Transition
The transition to forward-facing should happen only when a child has outgrown the height or weight limits of their rear-facing seat — not at a specific birthday. Once they make the transition, the goal is to keep them in a forward-facing harness seat for as long as the seat’s limits allow before moving to a booster.
Harness Types in Forward-Facing Seats
Forward-facing seats use a 5-point harness system: two shoulder straps, two hip straps, and a crotch buckle all connecting at a central chest clip. This distributes crash forces across five points of the child’s body — shoulders, hips, and chest — rather than just the lap and shoulder belt of an adult seat belt.
5-point harness anatomy — chest clip must be at armpit level, never at the belly or neck
Forward-Facing Weight and Height Limits
Most forward-facing harness seats have weight limits of 40–65 lbs and height limits between 43–49 inches. Always use both limits — a child who reaches the height limit before the weight limit must still move to the next stage. The harness is no longer providing correct geometry when the shoulder straps can’t sit at or above the shoulders at full height.
| Readiness Signal | Action Required |
|---|---|
| Child’s weight exceeds seat’s forward-facing limit | Move to booster seat immediately |
| Child’s head is within 1 inch of top of seat back | Move to booster — top of ears may also be used as reference |
| Harness slots are below child’s shoulders | Rethread to slot at or above shoulders, or move to booster |
| Child is under 40 lbs and fits harness correctly | Stay in forward-facing harness — do not rush to booster |
For road trips with forward-facing children, our road trip safety guide covers how to plan stops and manage restraint comfort over long distances — keeping kids safely buckled without turning every hour into a battle.

ClickTight installation system makes correct seat-belt installation foolproof. Steel-reinforced frame, side-impact protection. Forward-facing to 65 lbs with 5-point harness.
🛒 Check Price on Amazon*As an Amazon Associate we earn from qualifying purchases.
Booster Seats: Bridging the Gap to the Adult Belt
A booster seat’s job is simple but essential: it raises the child up so the vehicle’s own seat belt falls in the right position across their body. Without a booster, the lap belt crosses the abdomen instead of the hip bones, and the shoulder belt cuts across the neck instead of the chest — a configuration that causes severe internal injuries and “submarining” (the child sliding under the belt) in a crash.
High-Back vs. Backless Boosters
High-back boosters provide head and neck support, side-impact protection, and are essential in vehicles without headrests or with low seat backs. They’re the better choice for most children. Backless boosters are lighter, more portable, and appropriate for older, larger children in vehicles with adequate head support, but they offer no side-impact protection at all.
| Feature | High-Back Booster | Backless Booster |
|---|---|---|
| Side-impact protection | ✓ Yes (most models) | ✗ None |
| Head and neck support | ✓ Yes | ✗ Relies on vehicle seat |
| Vehicle headrest needed | No (provides its own) | ✓ Required |
| Portable / travel use | Heavier, bulkier | Lightweight, compact |
| Appropriate age/size | 40–120 lbs (most children) | Larger children 60+ lbs |
| Recommended for most | ✓ Yes | Only when child is older and large |
Booster seats do not use a harness. The vehicle’s seat belt does the restraining. Never use a harness clip or additional aftermarket strap with a booster seat. The seat belt must pass through the booster’s belt guide channels to work correctly.

One of the longest-running, most trusted high-back booster designs. Converts to backless. Fits children up to 120 lbs. Adjustable headrest, armrests, built-in cup holders.
🛒 Check Price on Amazon*As an Amazon Associate we earn from qualifying purchases.
Seat Belt Graduation: The 5-Step Test
Many children graduate from a booster to a seat belt alone before they’re actually ready. The test isn’t age — it’s fit. A child riding with a poorly fitting seat belt is at real risk of serious internal injury in a crash, even though they appear restrained.
The 5-Step Test — a child must meet all five criteria to safely ride without a booster
Most children don’t pass all five steps until age 10–12, and some not until 13. Passing four out of five isn’t enough. If the child slouches during trips, pulls the shoulder belt behind their back, or the lap belt rides up on the belly, they still need a booster.
Practical tip: The shoulder belt riding on the neck is the most common reason children need to stay in a booster longer. Until the vehicle’s B-pillar geometry puts the shoulder belt naturally on the collarbone — not the neck — the booster is still required. Never tuck the shoulder belt behind the back or under the arm.
Installation: LATCH vs. Seat Belt Method
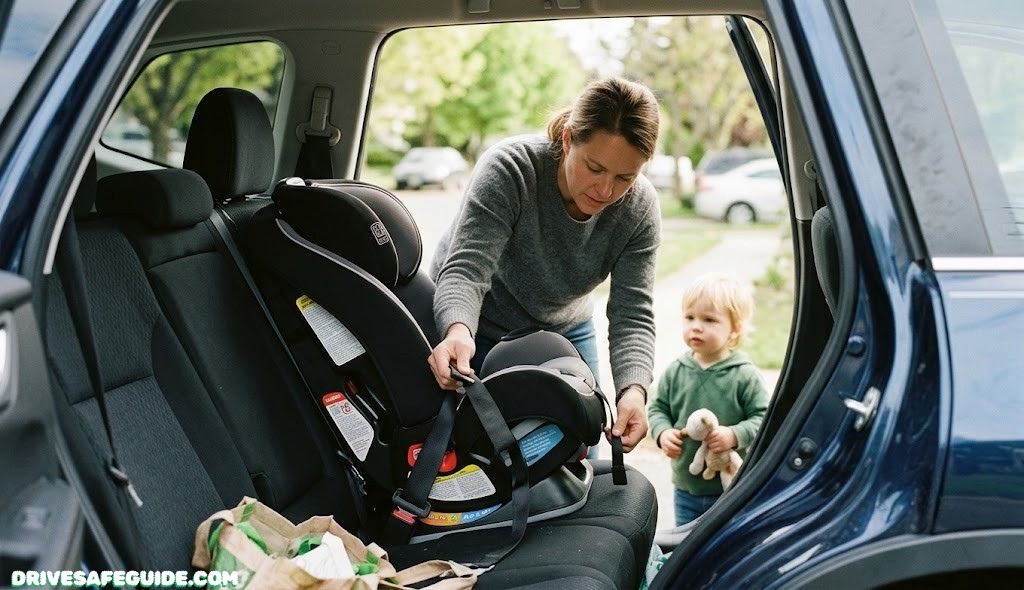
Studies show that car seat installation errors are extremely common, and many parents believe their seat is installed correctly when it isn’t. Understanding the two installation methods and their differences eliminates most errors before they happen.
LATCH: Lower Anchors and Tethers for Children
LATCH allows a car seat to attach directly to anchor points built into vehicle seats, eliminating the seat belt from the installation entirely. In vehicles made after 2002, you’ll find two lower anchors in the crease of the seat cushion and upper tether anchors behind or above the seat. LATCH makes installation more consistent and easier to perform correctly.
However, LATCH has a critical weight limit: most seats specify that LATCH may only be used up to a combined weight of 65 lbs (child weight + seat weight). Once the child exceeds approximately 40–45 lbs in a seat weighing 15–20 lbs, you must switch to the seat belt installation method — even if the seat itself fits fine.
LATCH installation: lower anchor connectors clip into seat crease anchors; top tether (forward-facing only) connects to anchor behind/above seat
Top Tether: Often Forgotten, Always Required
The top tether connects from the top of a forward-facing seat to a tether anchor in the vehicle (typically on the rear shelf, ceiling, or floor behind the seat). It reduces head excursion (forward head movement in a crash) by up to 4–6 inches. This matters enormously — head excursion is directly correlated with brain and spinal injuries. The top tether is not optional. It is required any time a forward-facing seat is installed, whether using LATCH or the seat belt method.
✅ Do
- Read both the car seat manual AND your vehicle manual
- Use the top tether for all forward-facing installations
- Verify less than 1 inch of movement at the belt path
- Switch to seat belt method when child + seat exceeds LATCH weight limit
- Have installation checked at a CPST inspection station
❌ Don’t
- Skip the top tether on a forward-facing seat
- Use LATCH and seat belt simultaneously (unless manual explicitly allows)
- Install rear-facing in the front seat with an active airbag
- Force LATCH connectors into wrong anchor points
- Assume “tight enough” without the 1-inch test
Installation confidence comes with practice and checking. NHTSA maintains a database of free car seat inspection events and certified CPST technicians at their SaferCar.gov website — a genuinely worthwhile 20-minute stop. Pair good installation habits with the broader safe driving principles that reduce the chance of incidents requiring the seat to do its job.

Energy-absorbing crumple zone, steel frame, anti-rebound bar. Rear-facing to 50 lbs, forward-facing to 65 lbs. One of the most safety-engineered convertible seats available.
🛒 Check Price on Amazon*As an Amazon Associate we earn from qualifying purchases.
Harness Fit: The Pinch Test and Getting It Right Every Trip
A correctly installed car seat with a poorly fitted harness still fails to protect a child. The harness is the last line of contact between the seat and the child, and it has to be snug on every single trip — not just during the initial setup.
The Pinch Test
After buckling and tightening the harness, pinch the webbing horizontally at the child’s collarbone level between your thumb and index finger. If you can pinch any slack webbing into a fold, the harness is too loose. Tighten the adjuster strap (usually at the front base of the seat) until you cannot pinch slack. Do the test at the collarbone — not at the belly, where there is always more webbing.
Harness Slot Position
Harness slot position is one of the most commonly missed setup details:
- Rear-facing: Harness straps must come from the slot at or below the child’s shoulders. This ensures the straps push down and into the seat during a frontal crash rather than allowing the child to move forward.
- Forward-facing: Harness straps must come from the slot at or above the child’s shoulders. This routes crash force into the strongest part of the harness system.
Never put a bulky coat under the harness. Winter coats compress 2–3 inches in a crash, creating that much slack in the harness instantly. The correct approach: buckle the child in regular clothing, perform the pinch test, then place a blanket or coat over the harness straps. This is one of the most common winter mistakes — see our winter car safety checklist for more on safe winter driving with children.
Crotch Buckle Slot Position
The crotch buckle must be in the slot closest to the child without forcing a gap. Check the seat manual — most seats have 2–3 slot options. A crotch buckle set too far forward allows “submarining,” where the child slides under the lap portion in a crash.
🎯 Quick Harness Fit Checklist
✓ Buckle clicks audibly into the chest clip · ✓ Chest clip at armpit level · ✓ No slack (pinch test passes) · ✓ Harness slots at correct height · ✓ No coat under straps · ✓ Crotch buckle in correct slot
The 10 Most Common Car Seat Mistakes
These are the errors that appear most frequently in NHTSA crash data and CPST inspection records. Some are invisible from the outside. All reduce crash protection significantly.
⚠️ 1. Rotating Rear-Facing Too Early
The most dangerous mistake. Many parents turn children forward-facing at age 1 or 2 based on age rather than the seat’s weight/height limit. Rear-facing provides dramatically better spinal protection and should continue as long as the seat allows.
⚠️ 2. Loose Harness
A harness that passes the pinch test during setup but isn’t re-tightened after the child sits can have 3–4 inches of slack. Always re-check and re-tighten after the child is seated on every trip.
⚠️ 3. Chest Clip in Wrong Position
A chest clip placed at belly level concentrates crash force on the soft abdomen, risking liver laceration and other internal injuries. It must be at armpit level — every time.
⚠️ 4. Seat Moves More Than 1 Inch
A seat that rocks or slides during a crash won’t restrain the child as designed. Grab the seat at the belt path and test — if it moves more than 1 inch side-to-side or front-to-back, reinstall.
⚠️ 5. Wrong Harness Slot Height
Rear-facing straps coming from above the shoulders allow the child to be thrown out of the seat. Forward-facing straps below the shoulders increase forward head excursion. Always match to the correct slot as the child grows.
⚠️ 6. Bulky Coat Under the Harness
As noted above, a winter coat compresses in a crash and leaves the harness dangerously slack. Dress children in thinner layers and cover with a blanket after buckling.
⚠️ 7. Skipping the Top Tether
Studies show the top tether reduces head excursion by up to 6 inches. It is required for all forward-facing installations. Many parents don’t even know the tether anchor exists in their vehicle.
⚠️ 8. Using an Expired or Post-Crash Seat
Plastic degrades, padding compresses, and standards change. An expired seat or one that has been in a significant crash may look fine but provide meaningfully reduced protection. Always check the expiration stamp before use.
⚠️ 9. Moving to Booster Before Outgrowing Harness
Children are safest in a 5-point harness as long as they fit. Parents often rush to boosters because the child is “big enough.” Big enough to fit correctly in a harness means stay in the harness.
⚠️ 10. Shoulder Belt Behind the Back or Under the Arm
Tucking the shoulder belt behind the back or under the arm because it’s “uncomfortable” eliminates upper-body restraint entirely. This is one of the most common booster-age mistakes, and it’s nearly impossible to detect from outside the vehicle.
Get a Free Inspection
The single most effective action for most parents is to have their installation checked by a certified Child Passenger Safety Technician (CPST). Inspection events are free, take 20–30 minutes, and NHTSA data shows that the majority of inspected seats require at least one correction. Find your nearest inspection station at SaferCar.gov.
How to Choose the Right Car Seat
With hundreds of models available, the practical question isn’t which seat is “best” in the abstract — it’s which seat fits your child, your vehicle, and your life. The most expensive seat that doesn’t fit your car or that you struggle to install correctly is far less safe than a mid-range seat that’s installed perfectly every time.
The First Question: Does It Fit Your Vehicle?
Car seats and vehicles are not universally compatible. A seat that installs easily in a mid-size sedan may not fit correctly in a compact car or a pickup truck back seat. Before purchasing, check:
- The vehicle has a back seat (front seat rear-facing is extremely dangerous with an active airbag)
- LATCH anchors are accessible and spaced correctly for the seat
- The seat reclines to the correct angle in rear-facing mode without the headrest interfering
- The seat fits within the vehicle seat’s width without spilling onto adjacent seats
Key Specs to Compare
| Spec | Why It Matters | What to Look For |
|---|---|---|
| Rear-facing weight limit | Higher limit = longer in safest position | 40–50 lbs for convertibles |
| Forward-facing weight limit | Delays booster transition | 65 lbs minimum |
| Top harness slot height | Determines how tall a child can be forward-facing | 18–20 inches from seat bottom |
| Seat width | Affects fit in compact vehicles | Check manufacturer specs vs vehicle |
| Anti-rebound bar (rear-facing) | Reduces rotational rebound in crash | Highly recommended for rear-facing seats |
| Installation method | Ease of correct installation affects real-world safety | LATCH + seat belt; one-pull tightener preferred |
| Side-impact protection | Deep side wings absorb door-crash energy | Look for energy-absorbing foam side wings |
Price vs. Safety
All car seats sold in the United States must meet the same NHTSA Federal Motor Vehicle Safety Standards (FMVSS 213). A $60 seat is not inherently less safe than a $400 seat. Premium seats often offer better ease of use, higher weight limits, better side-impact protection design, and more comfortable padding — which matters because a seat a child refuses to sit in isn’t protecting anyone. But the base safety floor is set by federal standards, not price.
Planning a road trip soon? Our road trip essentials checklist includes car seat checks as a key pre-trip item, and our road trip vehicle prep guide walks through the broader safety check that should accompany any long drive with children.

Steel-reinforced aluminum frame, slim design (3 across possible), rear-facing to 45 lbs, forward-facing to 120 lbs as booster. Excellent for families who want one seat for the full journey.
🛒 Check Price on Amazon*As an Amazon Associate we earn from qualifying purchases.
Top-Rated Seats by Category
| Category | Top Pick | RF Limit | FF Limit | Best Feature | Price Range |
|---|---|---|---|---|---|
| Best Infant Seat | Chicco KeyFit 35 | 35 lbs | N/A | Easiest install, newborn fit | $200–$260 |
| Best Convertible | Graco Extend2Fit | 50 lbs | 65 lbs | 4-position extension panel | $130–$175 |
| Best for Ease of Use | Britax Marathon ClickTight | 40 lbs | 65 lbs | ClickTight belt installation | $250–$340 |
| Best Safety Engineering | Clek Foonf | 50 lbs | 65 lbs | Steel frame + anti-rebound | $430–$510 |
| Best Budget | Safety 1st Grow & Go | 40 lbs | 65 lbs | Wide size range, affordable | $80–$110 |
| Best All-in-One | Diono Radian 3RXT | 45 lbs | 120 lbs | Slim fit — 3 across possible | $360–$430 |
| Best High-Back Booster | Graco Affix | N/A | 40–100 lbs | LATCH for positioning, compact | $60–$90 |
If you’re also outfitting your vehicle more broadly, our guides on safety gear for new car owners and essential car safety accessories cover the equipment stack beyond the car seat itself — first aid, emergency escape tools, and the other items that complete a family-prepared vehicle.
Travel tip: If you’re renting a car or flying and using a car seat, check whether the seat is FAA-approved for aircraft use (look for the red FAA label). Most harnessed car seats are FAA-approved; booster seats are not. On a long road trip, our cross-country driving checklist covers all the prep your vehicle needs before heading out with kids in tow.

Rear-facing to 40 lbs, forward-facing harness to 65 lbs, booster to 100 lbs. Meets all federal safety standards at the lowest price in class. Excellent first seat choice.
🛒 Check Price on Amazon*As an Amazon Associate we earn from qualifying purchases.
Frequently Asked Questions
-
Until what age should a child ride rear-facing?
Children should ride rear-facing until they reach the maximum height or weight limit of their rear-facing car seat — not until a specific age. Most convertible seats support rear-facing up to 40–50 lbs, which means many children can remain rear-facing well past age 2. The American Academy of Pediatrics recommends keeping children rear-facing as long as possible within the seat’s limits. Leg length and apparent discomfort are not safety concerns — head and neck protection is what matters. -
When can a child move from a car seat to a booster?
A child should move to a booster seat only after outgrowing the harness limits of their forward-facing seat — typically when they exceed the height or weight maximum listed on the seat. This usually happens between ages 4–7, depending on the child’s size and the seat’s specifications. Never move to a booster just because a child is old enough — stay in the harness seat as long as possible. -
Is it safe to use a second-hand car seat?
It can be safe only if you can verify the full history of the seat: it has never been in any crash, it is not expired, all parts and labels are intact, and you have the original manual. If any of these conditions cannot be confirmed with certainty, do not use the seat. Car seats have expiration dates (usually 6–10 years from manufacture) stamped on the base or shell. When buying used from a stranger, you cannot verify crash history — the safest choice in that case is a new seat. -
Can a car seat expire? How do I find the expiration date?
Yes. Car seats expire, typically 6–10 years from the date of manufacture. The expiration date is usually printed or stamped on a label on the bottom or back of the seat shell, or molded directly into the plastic. Never use an expired car seat — plastic degrades, padding compresses, and safety standards change over time. When the expiration date arrives, the seat should be destroyed and recycled (many retail stores run trade-in programs). -
What is the pinch test for car seat harness fit?
After buckling and tightening the harness, try to pinch the webbing at the child’s collarbone level between your thumb and forefinger. If you cannot pinch any slack webbing — your fingers slide off the strap — the harness is correctly tightened. If you can grab a fold of webbing, it needs to be tightened further using the adjuster strap. Do this test on every trip after the child is seated, since the harness can loosen as the child settles. -
Should the chest clip be at armpit or belly level?
The chest clip must sit at armpit level — aligned with the child’s armpits, across the sternum. A chest clip positioned at the belly concentrates crash force on the soft abdominal organs, which can cause serious internal injury. A clip too high can restrict the airway or cause neck injury. Armpit level is the only correct and safe position. Check it on every trip — young children often move the clip while sitting. -
What does LATCH mean on a car seat?
LATCH stands for Lower Anchors and Tethers for Children. It is a standardized connector system that attaches the car seat directly to anchor points built into most vehicles manufactured after 2002, without routing through the seat belt. LATCH has a combined weight limit of 65 lbs (child weight + seat weight), after which installation must be done using the vehicle seat belt instead. The top tether is part of the LATCH system and should always be used for forward-facing seats. -
Can I put a car seat in the front passenger seat?
Rear-facing car seats must never be placed in the front seat of a vehicle with an active front passenger airbag. Airbag deployment in a crash can be fatal to a rear-facing infant or toddler. Forward-facing seats and boosters can physically be used in the front seat if the vehicle has no rear seating, but the back seat is always the safest position for children under 13. If placed in the front, deactivate the passenger airbag if possible. -
Does a thick winter coat affect car seat safety?
Yes, significantly. Thick coats compress dramatically in a crash — sometimes 3 or more inches — leaving the harness with that much slack in the fraction of a second that matters. The correct approach is to buckle the child in their regular clothes, perform the pinch test, then place a coat or blanket over the harness straps for warmth. Never put a bulky coat on under the harness. Thin fleece layers worn under the harness are acceptable. -
How do I know if my car seat installation is correct?
After installation, grab the seat at the belt path and try to move it side-to-side and front-to-back. A correctly installed seat should move no more than 1 inch in any direction. Also confirm the correct recline angle using the built-in indicator (for rear-facing). The most reliable verification is having your installation checked by a certified Child Passenger Safety Technician (CPST) at a free inspection event — NHTSA’s SaferCar.gov website lists inspection stations near you. -
When is a child ready for a seat belt only (no booster)?
A child is ready when they pass the 5-Step Test on every trip: back flat against vehicle seat; knees bending naturally at seat edge; lap belt crossing low on the thighs; shoulder belt crossing the chest and collarbone (not the neck); and sitting correctly for the entire trip without slouching. Most children don’t reach all five criteria until age 10–12. If they fail any step, they still need a booster. -
Can I use a car seat after a minor fender-bender?
NHTSA says a seat may be continued in use after a minor crash only if all of the following are true: the vehicle could be driven away under its own power; the door nearest the seat was undamaged; no one in the vehicle was injured; the airbags did not deploy; and there is no visible damage to the seat. If any condition is not met, replace the seat. When uncertain, replace it and check with your insurance company — many policies cover replacement after any crash.
Every Trip Starts with the Right Seat, Correctly Installed
Car seat safety isn’t a single decision — it’s a practice that evolves as your child grows. Choose a seat that fits your child and your vehicle. Install it correctly, verify it at every stage, and re-check the harness on every trip. When your child passes the 5-Step Test, graduate them to the next stage. And if you’re ever uncertain, a free CPST inspection takes 20 minutes and costs nothing.
The seat doesn’t protect your child by being in the car. It protects them by being right.
🛒 Shop Top-Rated Car Seats on Amazon*As an Amazon Associate we earn from qualifying purchases at no extra cost to you.