The Definitive Guide: How to Store Summer Tires for the Winter
The first frost has arrived. The air is crisp, and the threat of snow, sleet, or just dangerously cold pavement is real. You’ve done the responsible thing: you’ve swapped your soft, grippy summer tires for a set of dedicated winter treads. You’re ready to tackle black ice and understand why front-wheel drive in snow (with the right tires) is perfectly capable.
But now what? You’ve got a stack of four heavy, dirty, and *very* expensive summer tires sitting in your driveway. Your first instinct is to roll them into the corner of the garage, toss them in the shed, or stack them under the deck.
**Stop.** How you store those tires for the next 4-6 months will determine whether they last for five more seasons… or if they’ll be cracked, deformed, and useless by spring.
Tires are not just “rubber.” They are a complex, high-tech chemical compound. And that compound has enemies: sunlight, ozone, extreme temperatures, and even gravity. You are not just “storing” your tires; you are *preserving* your investment. This is the definitive masterclass on how to do it like a pro.
Part 1: Why You *Must* Store Summer Tires Correctly
This isn’t just about “neatness.” This is about science. Summer tires (especially “performance” tires on a car like John Wick’s Mustang) are made from a special rubber compound designed for maximum grip in warm weather.
This compound has a “glass transition temperature.” Below a certain point (around 40-45°F or 7°C), the rubber begins to change. It goes from being soft, pliable, and sticky to being hard, brittle, and slippery—like a hockey puck.
DANGER: The Enemies of Rubber
If you leave your summer tires in an unheated shed or, worse, *outside* during the winter, you are destroying them.
- Cracking: The freezing temperatures can cause microscopic (and not-so-microscopic) cracks to form in the tread blocks and sidewalls. This is a catastrophic, unrepairable failure.
- UV Damage: The sun is your tire’s worst enemy. Just as it damages your car’s paint (a topic we cover in how to protect car paint), its UV rays attack the polymers in the rubber, causing “ozonolysis” or “dry rot.”
- Deformation: Storing them incorrectly (which we’ll cover) can put all the weight on one small spot, causing flat-spotting or sidewall deformation. By spring, your tires will be “egg-shaped,” and you’ll be wondering why your car shakes when you drive.
Improper storage can cost you thousands of dollars in new tires and is a massive safety risk.
Part 2: The 5-Step Pre-Storage “Prep” Ritual
You can’t just take them off the car and toss them in a bag. You must prepare them for “hibernation.” This is a crucial part of your car preparation checklist, just in reverse.
Step 1: Inspect and Label
Now is the time to be a detective. While the tires are off the car, inspect each one. Look for:
- Nails or other punctures.
- Bulges in the sidewall (a sign of internal failure).
- Uneven wear (a sign you may need an alignment next season).
Most importantly: **Label them.** Get a tire marker, chalk, or even a piece of masking tape. Label each tire’s *original* position: “FR” (Front Right), “FL” (Front Left), “RR” (Rear Right), “RL” (Rear Left). This is *critical* for proper tire rotation next spring, which is the #1 way to make your tires last.
Step 2: Clean, Clean, Clean
This is the most important step. Your tires are caked in a toxic mix of brake dust, road grime, salt, and oil.
**Brake dust is not just “dirt.”** It’s a collection of tiny, hot iron particles from your brake rotors. Left to sit for 6 months, these particles will embed themselves in your wheel’s finish and *corrode* the rubber itself.
Use a proper, pH-neutral tire and wheel cleaner. **Do not use dish soap.** Use a soft-bristled brush for the tires and a set of “wheel woolies” for the rims (if they’re still mounted). Get in all the nooks and crannies.
Step 3: Dry… Then Dry Again
Your tires must be **100% bone dry** before storage. Water trapped in a bag or in the tread grooves will lead to mold, mildew, and can accelerate corrosion on the wheels. Use a leaf blower or an old towel. Let them sit in the (dry) garage for a few hours.
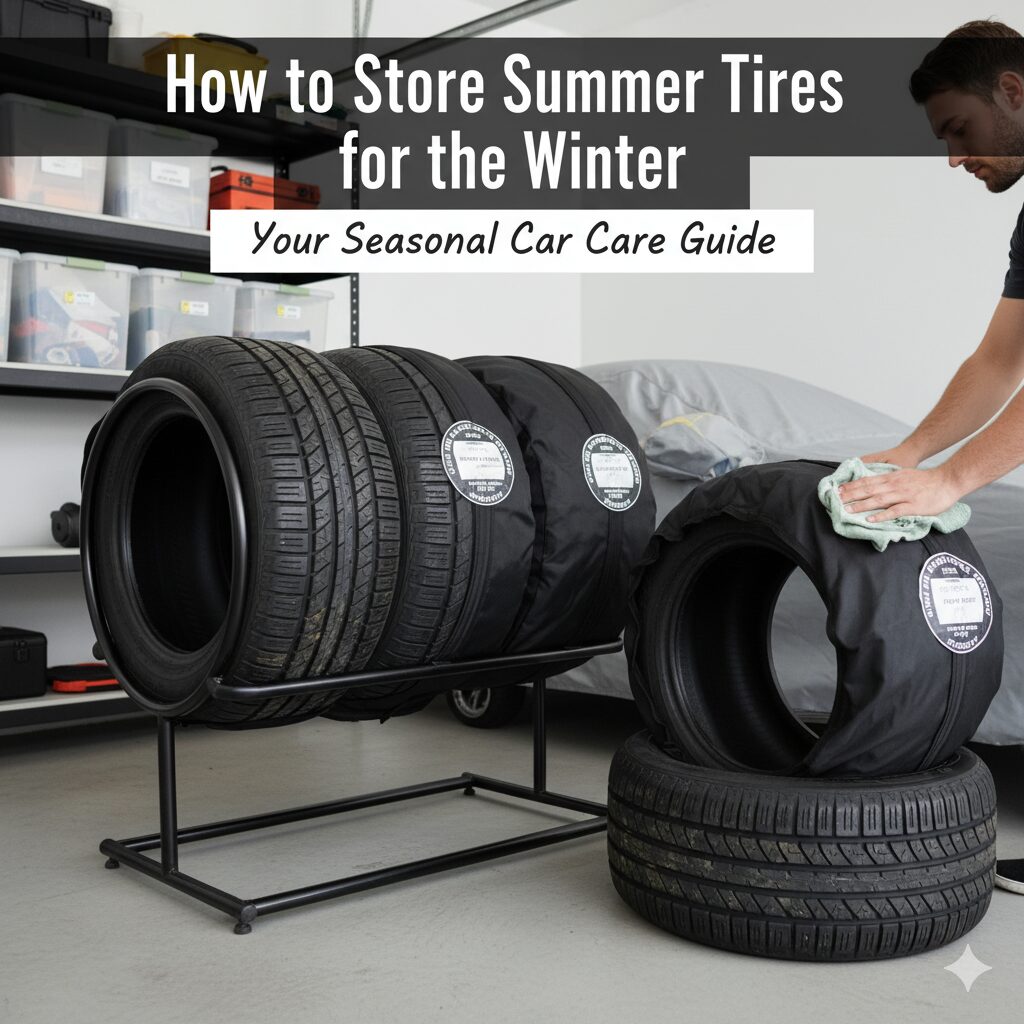
Step 4: To Bag or Not to Bag? (Bag Them)
**Yes, bag them.** This is a pro-level move. Storing tires in individual, opaque, airtight bags creates a “micro-climate” that seals them off from their enemies:
- It blocks UV light.
- It stops oxygen and ozone from reaching the rubber.
- It contains the (often stinky) smell of rubber.
You can use large, heavy-duty trash bags. A great trick is to put the tire in the bag and use a vacuum cleaner to suck all the air out before sealing it with tape. Or, you can get the “easy button” solution…
Step 5: No Dressing!
This is a common mistake. **Do not apply tire shine or dressing.** These products are designed for cosmetic, short-term use. The solvents in them can actually *degrade* the rubber’s natural protective compounds during long-term storage. Clean, dry, and un-dressed is the way to go.
Part 3: The “Location” Battle: Where to Store Your Tires
This is the decision that will make or break your investment. The perfect storage location must be **cool, dry, dark, and climate-stable.**
The “Enemies List” for Your Storage Spot
The 4 Enemies of Your Tire’s “Hibernation”
- 1. The Sun: As mentioned, UV light is the #1 killer. The storage spot MUST be dark.
- 2. Extreme Temperatures: A hot, uninsulated attic or a baking-hot metal shed is a “tire oven.” It will heat-cycle the rubber and dry it out. Likewise, a freezing-cold outdoor shed will cause the same cracking issues.
- 3. Ozone (The Stealth Killer): This is the one most people don’t know about. Ozone is a gas that *loves* to attack rubber. Where does it come from? **Electric motors.** Never, *ever* store your tires next to a furnace, a hot water heater, a sump pump, or an electric generator.
- 4. Chemicals: Keep tires away from *all* solvents, gasoline, oil, or other chemicals. The fumes alone can break down the rubber.
So, Where is the “Perfect” Spot?
- WINNER: A dry, dark basement. The temperature is stable (50-70°F) all year round. It’s the ideal spot.
- GOOD: An insulated, attached garage. It’s dark, dry, and stays *mostly* climate-stable.
- BAD: A non-insulated shed, a hot attic, or your driveway.
- THE WORST: Outdoors, under a tarp. This is a *terrible* idea. It traps moisture (hello, mold) and creates a “greenhouse effect” that bakes the tires. Never do this.
Part 4: The “Positioning” Masterclass: Stack vs. Stand
You’ve got your clean, dry, bagged tires. You’ve found the perfect spot in your basement. Now, how do you *place* them?
**The answer depends 100% on one question: Are they on the wheels or not?**
Scenario 1: Unmounted Tires (Just the Rubber)
If you paid a shop to swap your tires, and you just have the four “donuts” of rubber, the rule is simple:
- DO: Stand them up, side-by-side (like soldiers). This puts the least amount of stress on them.
- DON’T: Stack them horizontally. A “stack” of four unmounted tires puts all the weight on the bottom tire, deforming its sidewall and bead.
- Pro-Tip: If you’re a real perfectionist, rotate them (give them a quarter turn) once a month to prevent any flat spots.
Scenario 2: Mounted Tires (On the Wheels)
If you have a dedicated set of summer *wheels* (like a cool set for Walter White’s car, if he cared about it), the rules are the *exact opposite*.
- DO: Stack them horizontally. The wheel provides full support, so the tire isn’t being crushed. Place a piece of cardboard or a wheel protector between each rim to prevent scratches.
- DON’T: Stand them upright. The combined weight of the wheel and tire resting on one small patch of rubber for 6 months is a recipe for flat spots, which will give you that annoying vibration in the spring.
- BEST METHOD: Hang them. The *ideal* way to store mounted tires is to hang them on the wall. This takes up zero floor space and puts no pressure on the tires at all.
Part 5: The Two “Must-Have” Products for Easy Storage
You can use trash bags and cardboard, but if you want to make this process easier, cleaner, and more professional, these are the two budget-friendly gadgets to get. They also make a fantastic unique gift for a car lover.

The “Easy Button”: Michelin Heavy-Duty Tire Totes
Stop wrestling with giant, leaky trash bags. Tire totes are the “civilized” solution to bagging your tires.
Why It’s a Storage Essential
These totes are basically purpose-built duffel bags for your tires. They are made of a heavy-duty, opaque material that instantly blocks UV light. But their best feature is the **handle**.
A 50-pound tire and wheel is an awkward, dirty, and heavy object. The built-in handle makes it *infinitely* easier to carry them from your driveway to your basement without getting brake dust all over your clothes. It’s a simple, brilliant car accessory that protects your tires, your home, and your back.
Pros
- Strong handles make carrying tires easy and clean
- Durable, opaque material blocks 100% of UV light
- Contains the rubber smell and any remaining dirt
- Reusable for many years; looks neat and organized
Cons
- Not 100% airtight like a vacuum-sealed bag
- Must buy the correct size for your tires

The “Space Saver”: HyLoft Folding Wall-Mounted Tire Rack
Your basement and garage have one thing in common: you’re out of floor space. The pro solution is to go *vertical*.
Why It’s a Storage Essential
This rack is a brilliant piece of engineering. You mount it directly to the studs in your garage wall, and it can hold up to 300-400 pounds of tires and wheels. This is the **single best way to store *unmounted* tires** (as it lets them stand on their tread) and a *fantastic* way to store mounted tires (as it’s a form of stacking/hanging).
It gets your $2,000 investment off the damp concrete floor, away from any potential chemical spills, and safe from being knocked over. In the summer, it folds flat against the wall. This is a perfect luxury driving gift for the person who loves an organized garage.
Pros
- Frees up valuable floor space
- Keeps tires safe from floor moisture and chemicals
- Folds flat when not in use
- The ideal storage position (standing or stacked)
Cons
- Requires installation and must be screwed into wall studs
- You have to lift the tires up onto the rack
Part 6: The “Welcome Back” Checklist (Re-Installing in Spring)
You did it! You’ve survived the winter. It’s spring, and it’s time to put your beautiful summer wheels back on. You’re not done yet.
- Check Your Labels: This is why you did it! Now you can properly rotate your tires. (e.g., the “FR” tire can move to the “RR” position, based on your car’s rotation pattern).
- Final Inspection: Give them a final once-over. Is the rubber still soft? No cracks?
- Inflate to Spec: Your tires *will* have lost air. They are not ready to drive. Inflate them all to the *exact* pressure listed on the sticker inside your driver’s door.
- Install and Torque: When you put the wheels back on, don’t just “Star-pattern” them with the impact wrench. Hand-tighten the lug nuts, lower the car, and use a **torque wrench** to tighten them to the *exact* factory-specified “foot-pounds.” This prevents warped rotors and is a critical part of your safety checklist.
Part 7: Frequently Asked Questions & Fun Quizzes
What if I don’t have a garage OR a basement?
You have two options. First, a climate-controlled self-storage unit. Second, and much easier, is a “Tire Hotel.” Many tire shops and dealerships will store your off-season tires for you for a monthly or seasonal fee. They’re insured, climate-controlled, and do all the work.
This seems like a lot of work. Can’t I just use all-season tires?
You can, but “all-season” is a compromise. They are the “jack of all trades, master of none.” They will never grip as well in a heavy rain as a summer tire, and they will never grip as well in snow as a winter tire. If you have a high-performance car, all-seasons are a significant downgrade.
What if my check engine light is on? Does this matter for storage?
No, the two are not related. But if your light is on, you should find out why! It could be a simple sensor, or it could be a warning of a blown head gasket.
This process is straightforward, right?
Absolutely. This is a task that anyone can do. Even if you’re a person with a learning disability or a deaf person, this is a simple, physical, visual process. And if you’re a new driver, this is one of the *best* habits you can learn to become a responsible car owner.
Are You a True “Car Person”? Test Your Knowledge!
You know how to store your tires, but what about the rest? Test your all-around car and driving knowledge with our fun quizzes.
Final Verdict: Protect Your Investment
Your summer tires are a high-performance, high-dollar investment. Treating them with a little respect during the off-season is the single best way to protect that investment.
Remember the rules:
- **Clean, Dry, and Label** them.
- **Bag** them in opaque, airtight totes.
- **Store** them in a **Cool, Dry, Dark, and Ozone-Free** location (like a basement).
- **Position** them correctly: **Stand** unmounted tires, **Stack** mounted tires.
It’s a simple, one-hour process that will save you thousands of dollars and ensure your car is safe and ready to grip the road when spring arrives.
For more in-depth safety guides, quizzes, and tips, explore all of DriveSafeGuide.com.